
Set Up Kpow with NetApp Instaclustr Platform
.webp)
Table of contents

Overview
NetApp Instaclustr provides a robust, fully managed platform for open-source Apache Kafka, eliminating the complex operational overhead of running a distributed streaming ecosystem. While the platform ensures infrastructure reliability and scalability, engineering teams still need a powerful, intuitive tool to monitor, manage, and interact with their live Kafka resources.
Kpow bridges this gap by acting as a comprehensive engineering toolkit for your Instaclustr environment. Fully compatible out of the box, Kpow connects seamlessly to your managed brokers, Karapace Schema Registry, and Kafka Connect clusters using standard Kafka protocols, which delivers a single pane of glass without the need for proprietary plugins, sidecars, or complex custom configurations.
About Factor House
Factor House is a leader in real-time data tooling, empowering engineers with innovative solutions for Apache Kafka® and Apache Flink®.
Our flagship product, Kpow for Apache Kafka, is the market-leading enterprise solution for Kafka management and monitoring.
Start your free 30-day trial or explore our live multi-cluster demo environment to see Kpow in action.
Prerequisites
To connect Kpow to Instaclustr, you must have the following resources provisioned:
- A running Instaclustr Kafka cluster: Reachable from the host where you intend to run Kpow.
- Network reachability (Firewall Rules): You must add the public IP address of the machine running Kpow to the Firewall Rules in the Instaclustr console.
- Kafka Connection Details: Your Kafka Bootstrap Server addresses.
- Kafka Authentication: Your Kafka cluster username and password.
- Karapace Schema Registry (Optional): The Schema Registry URL (secured with a CA-signed certificate) and its associated username and password. Note: You must also add your IP to the Schema Registry Firewall Rules.
- Kafka Connect (Optional): The Connect REST URL and its associated username and password. Note: You must also add your IP to the Kafka Connect Firewall Rules.
- Kpow Enterprise License: Get a free 30-day trial.
Quick Start
The fastest way to connect Kpow to Instaclustr is using Docker.
Run the following command in your terminal, replacing the placeholder values with your specific cluster details found on the Connection Info page of your Instaclustr console:
docker run -p 3000:3000 \
  --env ENVIRONMENT_NAME="Instaclustr Demo" \
  --env BOOTSTRAP="<KAFKA-IP1>:9092,<KAFKA-IP2>:9092,<KAFKA-IP3>:9092" \
  --env SECURITY_PROTOCOL="SASL_PLAINTEXT" \
  --env SASL_MECHANISM="SCRAM-SHA-256" \
  --env SASL_JAAS_CONFIG='org.apache.kafka.common.security.scram.ScramLoginModule required username="<KAFKA_USERNAME>" password="<KAFKA_PASSWORD>";' \
  --env LICENSE_ID="<LICENSE_ID>" \
  --env LICENSE_CODE="<LICENSE_CODE>" \
  --env LICENSEE="<LICENSEE>" \
  --env LICENSE_EXPIRY="<LICENSE_EXPIRY>" \
  --env LICENSE_SIGNATURE="<LICENSE_SIGNATURE>" \
  factorhouse/kpow:latest
Notes
❗ Security protocol Depending on your Instaclustr setup, your SECURITY_PROTOCOL may be SASL_SSL instead of SASL_PLAINTEXT. Always verify this in your Instaclustr Connection Info.
💡 License details The license details can be obtained from your signup email or via the Factor House license portal.
❗ Authorization configuration For brevity, Kpow authorization configuration has been omitted. See Simple Access Control to enable necessary user actions.
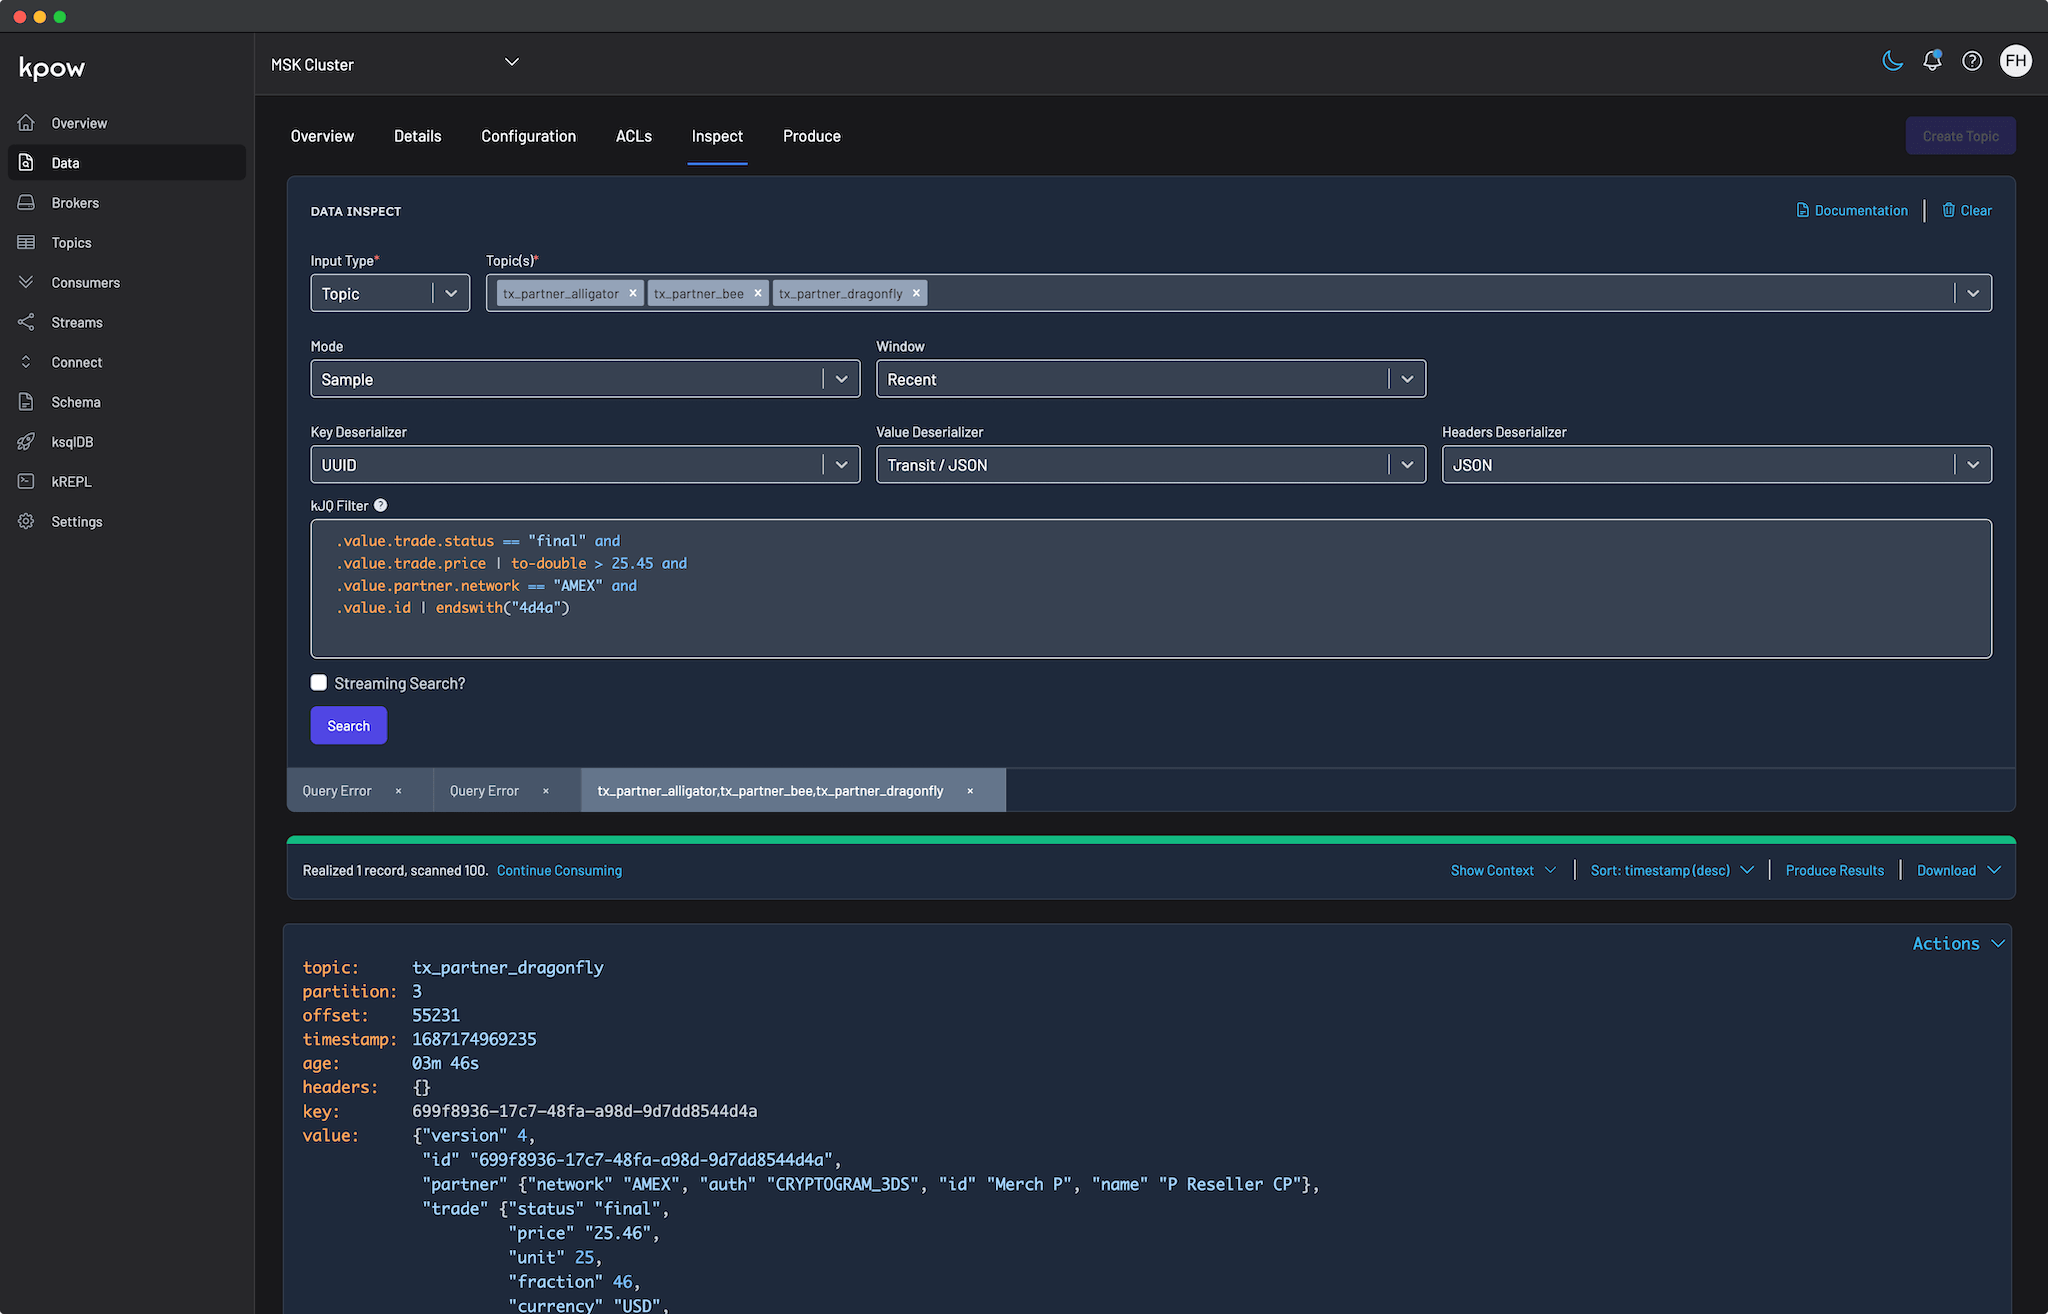
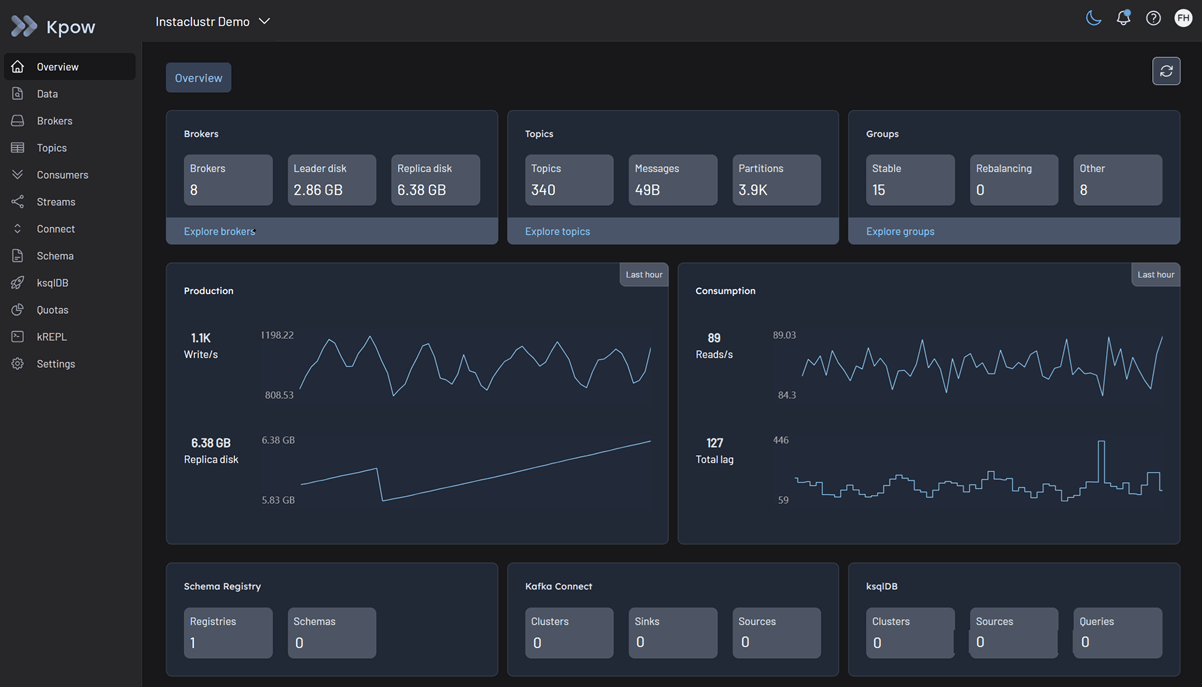
Once the container starts, open a browser and navigate to http://localhost:3000. You will immediately see your Instaclustr topics, consumer groups, and brokers.
Configuration Details
Connecting to Instaclustr is straightforward, but it requires gathering the correct information and ensuring network access is permitted.
Connection Info
All the necessary configuration parameters, including your Bootstrap Server IPs, username, and password, can be found on the Connection Info page of your cluster within the Instaclustr console.
Firewall Rules
Instaclustr secures clusters by blocking external traffic by default. If your Kpow container is failing to connect or timing out, ensure you have navigated to the Firewall Rules section of the Instaclustr console and added the IP address of the environment hosting Kpow.
Ecosystem Integration
If you have provisioned the Karapace Schema Registry as an enterprise add-on, or are running a Managed Kafka Connect cluster in your Instaclustr environment, Kpow can manage them natively.
❗ Important: Just like the Kafka brokers, you must manually update the Firewall Rules in the Instaclustr console for both the Schema Registry and Kafka Connect endpoints to allow Kpow to connect to them.
Karapace Schema Registry
To manage your schemas directly within Kpow, add the following environment variables to your deployment. Be sure to use the URL secured with a CA-signed certificate (found on the Schema Registry Connection Info page).
  --env SCHEMA_REGISTRY_NAME="Instaclustr Karapace" \
  --env SCHEMA_REGISTRY_URL="https://<REGISTRY_URL_WITH_CA_CERTIFICATE>:8085" \
  --env SCHEMA_REGISTRY_AUTH="USER_INFO" \
  --env SCHEMA_REGISTRY_USER="<SCHEMA_REGISTRY_USERNAME>" \
  --env SCHEMA_REGISTRY_PASSWORD="<SCHEMA_REGISTRY_PASSWORD>"
Managed Kafka Connect
To monitor connectors, tasks, and configurations, add your Connect cluster details. Instaclustr often requires permissive SSL for its Connect REST endpoints.
  --env CONNECT_NAME="Instaclustr Connect" \
  --env CONNECT_REST_URL="https://<KAFKA-CONNECT-IP>:8083" \
  --env CONNECT_PERMISSIVE_SSL="true" \
  --env CONNECT_AUTH="BASIC" \
  --env CONNECT_BASIC_AUTH_USER="<KAFKA_CONNECT_USERNAME>" \
  --env CONNECT_BASIC_AUTH_PASS="<KAFKA_CONNECT_PASSWORD>"
Production Deployment
When you are ready to move from a local Docker test to a production deployment, we recommend the following paths:
Kubernetes
For deploying Kpow to Kubernetes clusters running alongside your Instaclustr instances, we recommend using our official Helm Charts.
Bare Metal / VM
If you prefer running Kpow directly on a Virtual Machine, you can download the Kpow JAR file.
Conclusion
Kpow provides a powerful, single pane of glass view into your Instaclustr managed streaming infrastructure. By using standard Kafka protocols, you can unify your Kafka clusters, Karapace Schema Registry, and Managed Connect environments in minutes.
Explore these features in your own environment with a free 30-day trial of Kpow.
If you need assistance with your Instaclustr integration, reach out to our engineering support team at support@factorhouse.io.