Gain visibility, control, and security for Flink at scale. Flex puts you in command of Flink, delivering instant visibility, governed control, and enterprise-grade security. Run streaming jobs with confidence, precision, and speed.
Run your Flink at peak performance, confidently, securely, and at scale. See what’s happening in real time, act instantly, and keep your operations fully compliant.
Real-time visibility into jobs, checkpoints, metrics, configs, and state.
Act with confidence
Manage the full operational lifecycle of Flink jobs, including job submission, checkpointing, and savepointing.
Stay secure
Enterprise-grade governance with RBAC, SSO, Multi-Tenancy and data masking.
Why Flex is the Enterprise Standard for Apache Flink Control
Inspect everything, instantly
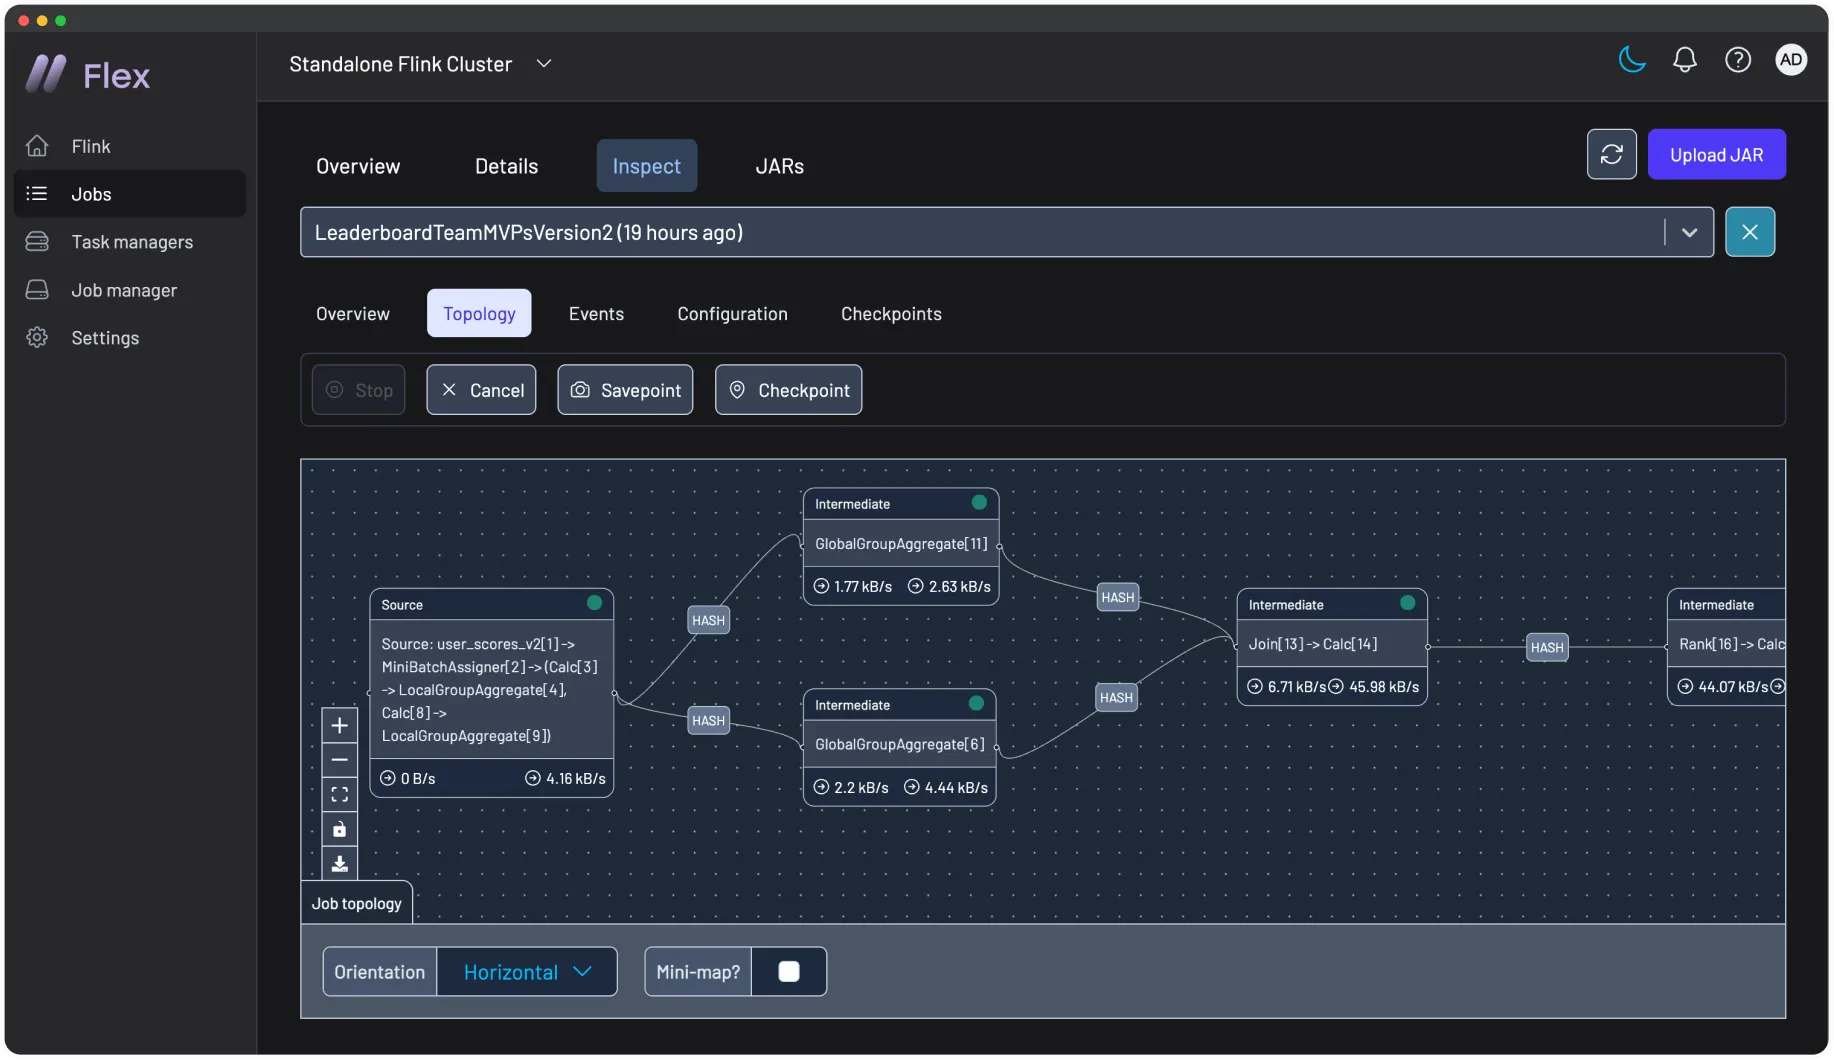
Understand your Flink jobs at a glance. From job graphs to checkpoint history, Flex gives your team the complete picture with enterprise-grade access control, including SSO and RBAC.
Manage the full job lifecycle
Securely manage the full Flink job lifecycle from the UI. Submit new pipelines, trigger savepoints for seamless upgrades or state backups, and cancel jobs when needed.
Intuitive for teams, powerful for pros
Our clean UI is backed by a REST API and integrates seamlessly with Prometheus and Webhooks for advanced monitoring and alerting.
Single view for your entire fleet
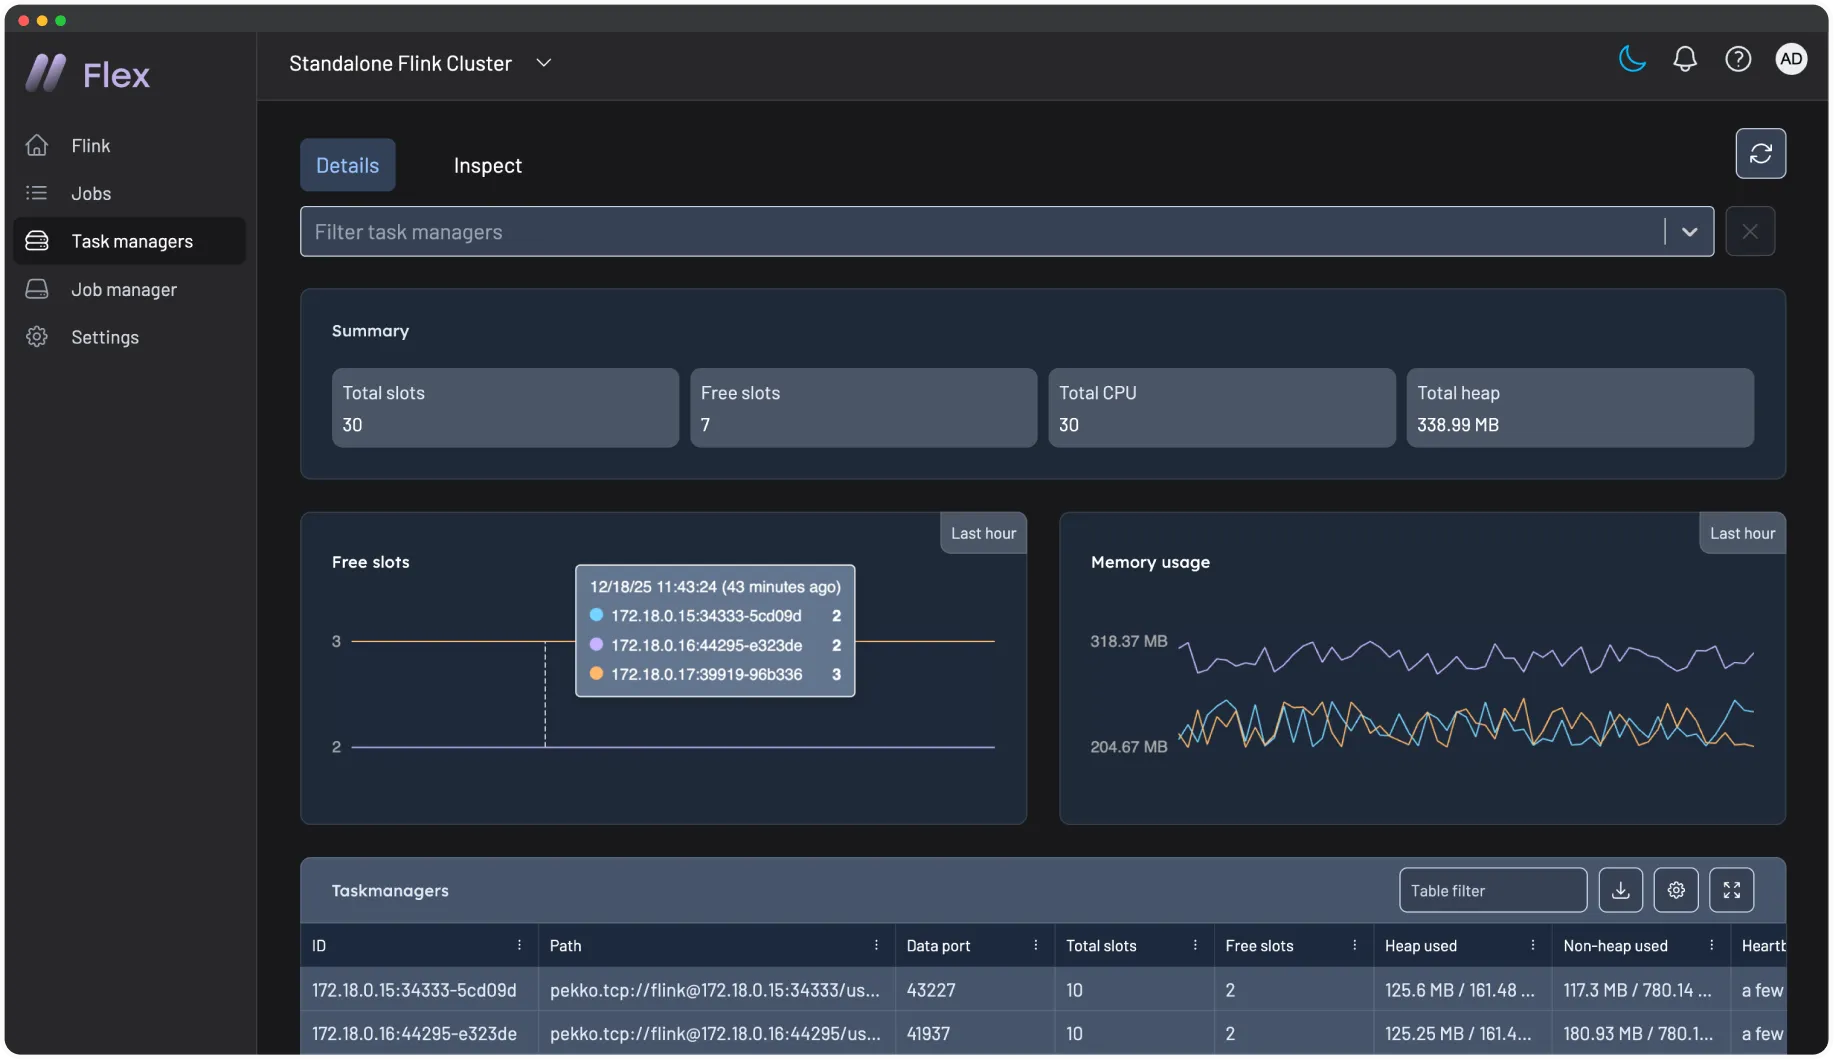
Manage your entire Flink fleet from a single control plane. Flex provides a unified view of all your application clusters, whether you have several co-located in one environment or dozens spread across hybrid and cloud infrastructures.
Built for the enterprise
Natively built for the enterprise with multi-tenancy, SSO, granular RBAC, audit logs, and full support for air-gapped deployments
What Makes Flex Unique
Immediate value
Go from installation to full visibility in minutes. A streamlined, lightweight setup means you connect to clusters and manage jobs immediately, skipping complex configuration.
Best-in-class UI
Designed with the same engineer-first ethos as Kpow, our UI translates complex Flink operations into clear, visual workflows, empowering your team to act with confidence.
Vendor-agnostic
Maintain a single, consistent control plane across your entire Flink ecosystem. Flex works seamlessly with a growing number of Flink distributions, including open-source Apache Flink and Ververica Platform, giving you true platform freedom.
Enterprise-trusted
Proven in mission-critical environments for enterprise-grade reliability. For Kpow users, the familiar UI provides a seamless, unified experience across your entire data-in-motion stack.
Lower TCO
Gain elite capabilities without the enterprise bloat or price tag. Flex lowers your Total Cost of Ownership by empowering your team with a lightweight, focused, and efficient tool.
Immediate value
Install, connect, and start managing jobs in minutes.
Best-in-class UI
Built with the same engineer-first ethos as Kpow
Vendor-agnostic
Works seamlessly across OSS Flink and a growing number of managed Flink distributions.
Enterprise-trusted
Trusted in mission-critical deployments, Flex’s familiar UI makes it a natural extension for Kpow users.
Lower TCO
Elite capability without the enterprise bloat (or price tag).
How Teams Use Flex
Flex accelerates stream processing operations across your org:
Job Lifecycle Management
Manage the complete Flink job lifecycle with fine-grained control. Submit jobs from uploaded JARs, resume from savepoints for seamless upgrades or recovery, and safely stop or cancel them when needed.
Deep Job Debugging
Visually inspect real-time job graphs, analyze exceptions, and drill into operator backpressure and watermarks to quickly identify and fix bottlenecks.
Live Task Analysis
Inspect individual task managers, view live logs, analyze thread dumps, and monitor memory to troubleshoot stuck or underperforming tasks.
Platform Observability
Get a unified, real-time view of your cluster's health, including memory and CPU usage, available task slots, and data throughput across all jobs.
Stream & State QA
Manage and monitor checkpoints and savepoints. Validate pipeline behaviour by inspecting task-level metrics, logs, and watermarks.
Governance & Security
Apply fine-grained access rules, redact sensitive data, and maintain audit trails for every action taken in the cluster.
What Customers Say
Engineering leaders trust Factor House to deliver reliable, scalable, and developer‑friendly solutions.
“I am grateful for the empathy and passion the Factor House team has shown in partnering with Airwallex to better understand our pain points to help drive the evolution of this brilliant product.”
Streamline your Kpow deployment on Amazon EKS with our guide, fully integrated with the AWS Marketplace. We use eksctl to automate IAM Roles for Service Accounts (IRSA), providing a secure integration for Kpow's licensing and metering. This allows your instance to handle license validation via AWS License Manager and report usage for hourly subscriptions, enabling a production-ready deployment with minimal configuration.
This guide provides a comprehensive walkthrough for deploying Kpow, a powerful toolkit for Apache Kafka, onto an Amazon EKS (Elastic Kubernetes Service) cluster. We will cover the entire process from start to finish, including provisioning the necessary AWS infrastructure, deploying a Kafka cluster using the Strimzi operator, and finally, installing Kpow using a subscription from the AWS Marketplace.
The guide demonstrates how to set up both Kpow Annual and Kpow Hourly products, highlighting the specific integration points with AWS services like IAM for service accounts, ECR for container images, and the AWS License Manager for the annual subscription. By the end of this tutorial, you will have a fully functional environment running Kpow on EKS, ready to monitor and manage your Kafka cluster.
The source code and configuration files used in this guide can be found in the features/eks-deployment folder of this GitHub repository.
About Factor House
Factor House is a leader in real-time data tooling, empowering engineers with innovative solutions for Apache Kafka® and Apache Flink®.
Our flagship product, Kpow for Apache Kafka, is the market-leading enterprise solution for Kafka management and monitoring.
VPC: A Virtual Private Cloud (VPC) that has both public and private subnets is required.
IAM Permissions: A user with the necessary IAM permissions to create an EKS cluster with a service account.
Kpow Subscription:
A subscription to a Kpow product through the AWS Marketplace is required. After subscribing, you will receive access to the necessary components and deployment instructions.
The specifics of accessing the container images and Helm chart depend on the chosen Kpow product:
Kpow Annual product:
Subscribing to the annual product provides access to the ECR (Elastic Container Registry) image and the corresponding Helm chart.
Kpow Hourly product:
For the hourly product, access to the ECR image will be provided and deployment utilizes the public Factor House Helm repository for installation.
Deploy an EKS cluster
We will use eksctl to provision an Amazon EKS cluster. The configuration for the cluster is defined in the manifests/eks/cluster.eksctl.yaml file within the repository.
Before creating the cluster, you must open this file and replace the placeholder values for <VPC-ID>, <PRIVATE-SUBNET-ID-* >, and <PUBLIC-SUBNET-ID-* > with your actual VPC and subnet IDs.
⚠️ The provided configuration assumes the EKS cluster will be deployed in the us-east-1 region. If you intend to use a different region, you must update the metadata.region field and ensure the availability zone keys under vpc.subnets (e.g., us-east-1a, us-east-1b) match the availability zones of the subnets in your chosen region.
Here is the content of the cluster.eksctl.yaml file:
Cluster Metadata: A cluster named fh-eks-cluster in the us-east-1 region.
VPC: Specifies an existing VPC and its public/private subnets where the cluster resources will be deployed.
IAM with OIDC: Enables the IAM OIDC provider, which allows Kubernetes service accounts to be associated with IAM roles. This is crucial for granting AWS permissions to your pods.
Service Accounts:
kpow-annual: Creates a service account for the Kpow Annual product. It attaches the AWSLicenseManagerConsumptionPolicy, allowing Kpow to validate its license with the AWS License Manager service.
kpow-hourly: Creates a service account for the Kpow Hourly product. It attaches the AWSMarketplaceMeteringRegisterUsage policy, which is required for reporting usage metrics to the AWS Marketplace.
Node Group: Defines a managed node group named ng-dev with t3.medium instances. The worker nodes will be placed in the private subnets (privateNetworking: true).
Once you have updated the YAML file with your networking details, run the following command to create the cluster. This process can take 15-20 minutes to complete.
eksctl create cluster -f cluster.eksctl.yaml
Once the cluster is created, eksctl automatically updates your kubeconfig file (usually located at ~/.kube/config) with the new cluster's connection details. This allows you to start interacting with your cluster immediately using kubectl.
kubectl get nodes
# NAME STATUS ROLES AGE VERSION
# ip-192-168-...-21.ec2.internal Ready <none> 2m15s v1.32.9-eks-113cf36
# ...
Launch a Kafka cluster
With the EKS cluster running, we will now launch an Apache Kafka cluster into it. We will use the Strimzi Kafka operator, which simplifies the process of running Kafka on Kubernetes.
Install the Strimzi operator
First, create a dedicated namespace for the Kafka cluster.
kubectl create namespace kafka
Next, download the Strimzi operator installation YAML. The repository already contains the file manifests/kafka/strimzi-cluster-operator-0.45.1.yaml, but the following commands show how it was downloaded and modified for this guide.
## Define the Strimzi version and download URL
STRIMZI_VERSION="0.45.1"DOWNLOAD_URL=https://github.com/strimzi/strimzi-kafka-operator/releases/download/$STRIMZI_VERSION/strimzi-cluster-operator-$STRIMZI_VERSION.yaml
## Download the operator manifest
curl -L -o manifests/kafka/strimzi-cluster-operator-$STRIMZI_VERSION.yaml ${DOWNLOAD_URL}
## Modify the manifest to install the operator in the 'kafka' namespace
sed -i 's/namespace: .*/namespace: kafka/' manifests/kafka/strimzi-cluster-operator-$STRIMZI_VERSION.yaml
Now, apply the manifest to install the Strimzi operator in your EKS cluster.
The configuration for our Kafka cluster is defined in manifests/kafka/kafka-cluster.yaml. It describes a simple, single-node cluster suitable for development, using ephemeral storage, meaning data will be lost if the pods restart.
After a few minutes, all the necessary pods and services for Kafka will be running. You can verify this by listing all resources in the kafka namespace.
kubectl get all -n kafka -o name
The output should look similar to this, showing the pods for Strimzi, Kafka, Zookeeper, and the associated services. The most important service for connecting applications is the Kafka bootstrap service.
Now that the EKS and Kafka clusters are running, we can deploy Kpow. This guide covers the deployment of both Kpow Annual and Kpow Hourly products. Both deployments will use a common set of configurations for connecting to Kafka and setting up authentication/authorization.
First, ensure you have a namespace for Kpow. The eksctl command we ran earlier already created the service accounts in the factorhouse namespace, so we will use that. If you hadn't created it, you would run kubectl create namespace factorhouse.
Create ConfigMaps
We will use two Kubernetes ConfigMaps to manage Kpow's configuration. This approach separates the core configuration from the Helm deployment values.
kpow-config-files: This ConfigMap holds file-based configurations, including RBAC policies, JAAS configuration, and user properties for authentication.
kpow-config: This ConfigMap provides environment variables to the Kpow container, such as the Kafka bootstrap address and settings to enable our authentication provider.
The contents of these files can be found in the repository at manifests/kpow/config-files.yaml and manifests/kpow/config.yaml.
kubectl get configmap -n factorhouse
# NAME DATA AGE
# kpow-config 5 ...
# kpow-config-files 3 ...
Deploy Kpow Annual
Download the Helm chart
The Helm chart for Kpow Annual is in a private Amazon ECR repository. First, authenticate your Helm client.
# Enable Helm's experimental support for OCI registries
export HELM_EXPERIMENTAL_OCI=1
# Log in to the AWS Marketplace ECR registry
aws ecr get-login-password \
--region us-east-1 | helm registry login \
--username AWS \
--password-stdin 709825985650.dkr.ecr.us-east-1.amazonaws.com
Next, pull and extract the chart.
# Create a directory, pull the chart, and extract it
mkdir -p awsmp-chart && cd awsmp-chart
# Pull the latest version of the Helm chart from ECR (add --version <x.x.x> to specify a version)
helm pull oci://709825985650.dkr.ecr.us-east-1.amazonaws.com/factor-house/kpow-aws-annualtar xf $(pwd)/* && find $(pwd) -maxdepth 1 -type f -delete
cd ..
Launch Kpow Annual
Now, install Kpow using Helm. We will reference the service account kpow-annual that was created during the EKS cluster setup, which has the required IAM policy for license management.
Note: The CPU and memory values are intentionally set low for this guide. For production environments, check the official documentation for recommended capacity.
Verify and access Kpow Annual
Check that the Kpow pod is running successfully.
kubectl get all -l app.kubernetes.io/instance=kpow-annual -n factorhouse
# NAME READY STATUS RESTARTS AGE
# pod/kpow-annual-kpow-aws-annual-c6bc849fb-zw5ww 0/1 Running 0 46s
# NAME TYPE CLUSTER-IP EXTERNAL-IP PORT(S) AGE
# service/kpow-annual-kpow-aws-annual ClusterIP 10.100.220.114 <none> 3000/TCP 47s
# ...
To access the UI, forward the service port to your local machine.
The Helm values are defined in values/eks-hourly.yaml.
# values/eks-hourly.yaml
env:
ENVIRONMENT_NAME: "Kafka from Kpow Hourly"envFromConfigMap: "kpow-config"volumeMounts:
# ... (volume configuration is the same as annual)
volumes:
# ...
resources:
# ...
Verify and access Kpow Hourly
Check that the Kpow pod is running.
kubectl get all -l app.kubernetes.io/instance=kpow-hourly -n factorhouse
# NAME READY STATUS RESTARTS AGE
# pod/kpow-hourly-kpow-aws-hourly-68869b6cb9-x9prf 0/1 Running 0 83s
# NAME TYPE CLUSTER-IP EXTERNAL-IP PORT(S) AGE
# service/kpow-hourly-kpow-aws-hourly ClusterIP 10.100.221.36 <none> 3000/TCP 85s
# ...
To access the UI, forward the service port to a different local port (e.g., 3001) to avoid conflicts.
In this guide, we have successfully deployed a complete, production-ready environment for monitoring Apache Kafka on AWS. By leveraging eksctl, we provisioned a robust EKS cluster with correctly configured IAM roles for service accounts, a critical step for secure integration with AWS services. We then deployed a Kafka cluster using the Strimzi operator, demonstrating the power of Kubernetes operators in simplifying complex stateful applications.
Finally, we walked through the deployment of both Kpow Annual and Kpow Hourly from the AWS Marketplace. This showcased the flexibility of Kpow's subscription models and their seamless integration with AWS for licensing and metering. You are now equipped with the knowledge to set up, configure, and manage Kpow on EKS, unlocking powerful insights and operational control over your Kafka ecosystem.
Flex is the management platform for enterprise Flink operations. It enhances Apache Flink with a sophisticated UI and a full REST API, providing the security, governance, and deep observability required to manage streaming jobs with confidence.
Comprehensive Job Visibility
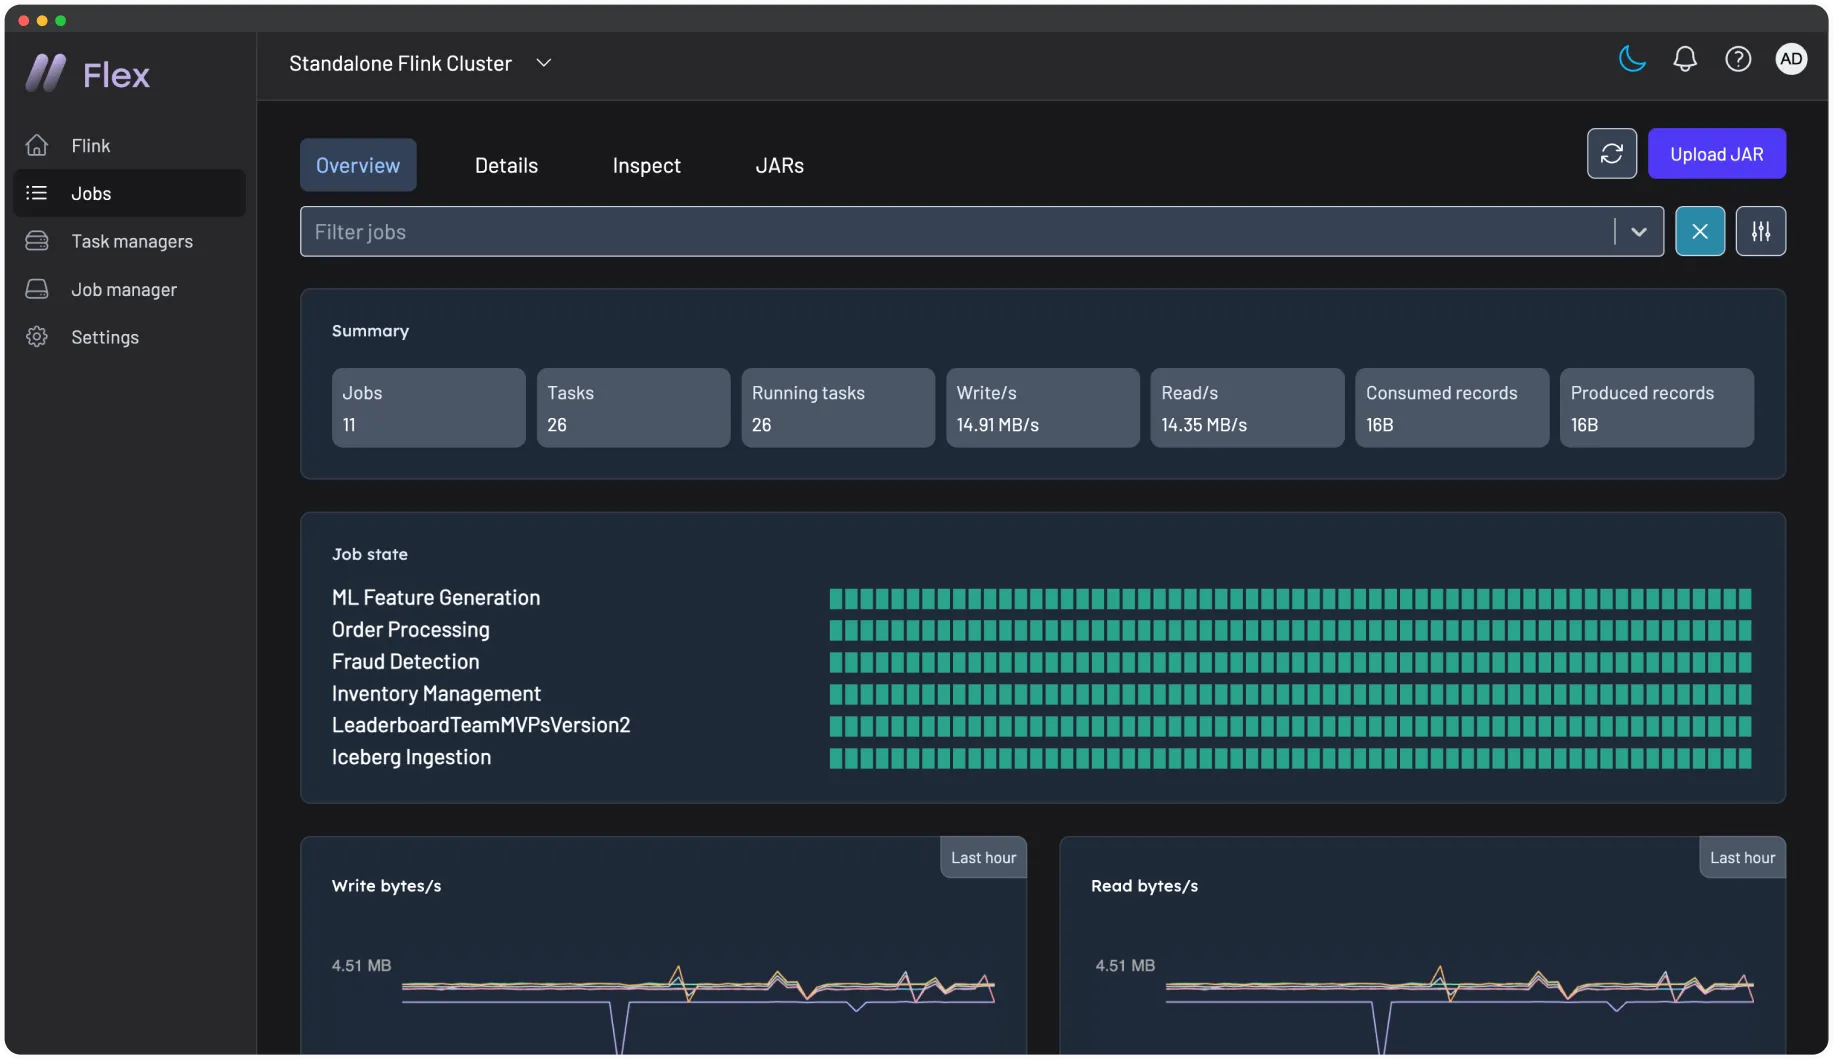
Visually inspect job graphs, sub-tasks, operators, and checkpoint history to instantly understand the health and structure of your Flink jobs.
Real-Time Performance Monitoring
Diagnose bottlenecks by visualizing critical Flink metrics, including backpressure, records-per-second, watermarks, and task-level exceptions.
Governed Operational Control
Securely manage the full lifecycle of jobs. Every action is protected by Role-Based Access Controls (RBAC) and recorded in a detailed audit log for full compliance.
Centralized Cluster Management
Monitor and manage jobs across multiple Flink clusters from a single, unified interface designed for large-scale and high-availability operations.
Enterprise-Grade Security
Enforce secure access with your choice of SSO providers (SAML, OIDC) and manage permissions with a robust Role-Based Access Control (RBAC) system.
Powerful REST API
Automate Flink management and integrate with CI/CD pipelines using a comprehensive REST API for complete programmatic control.
Flex Feature Matrix
Community
Perfect for local development or ephemeral environments.
Kpow empowers engineering teams at Fortune 500 companies, fintech innovators, and global platforms, managing hundreds of Kafka clusters. With proven performance at scale and minimal onboarding friction, it’s no wonder teams prefer Kpow over legacy vendor tools.
“I am grateful for the empathy and passion the Factor House team has shown in partnering with Airwallex to better understand our pain points to help drive the evolution of this brilliant product.”
Streamline your Kpow deployment on Amazon EKS with our guide, fully integrated with the AWS Marketplace. We use eksctl to automate IAM Roles for Service Accounts (IRSA), providing a secure integration for Kpow's licensing and metering. This allows your instance to handle license validation via AWS License Manager and report usage for hourly subscriptions, enabling a production-ready deployment with minimal configuration.
This guide provides a comprehensive walkthrough for deploying Kpow, a powerful toolkit for Apache Kafka, onto an Amazon EKS (Elastic Kubernetes Service) cluster. We will cover the entire process from start to finish, including provisioning the necessary AWS infrastructure, deploying a Kafka cluster using the Strimzi operator, and finally, installing Kpow using a subscription from the AWS Marketplace.
The guide demonstrates how to set up both Kpow Annual and Kpow Hourly products, highlighting the specific integration points with AWS services like IAM for service accounts, ECR for container images, and the AWS License Manager for the annual subscription. By the end of this tutorial, you will have a fully functional environment running Kpow on EKS, ready to monitor and manage your Kafka cluster.
The source code and configuration files used in this guide can be found in the features/eks-deployment folder of this GitHub repository.
About Factor House
Factor House is a leader in real-time data tooling, empowering engineers with innovative solutions for Apache Kafka® and Apache Flink®.
Our flagship product, Kpow for Apache Kafka, is the market-leading enterprise solution for Kafka management and monitoring.
VPC: A Virtual Private Cloud (VPC) that has both public and private subnets is required.
IAM Permissions: A user with the necessary IAM permissions to create an EKS cluster with a service account.
Kpow Subscription:
A subscription to a Kpow product through the AWS Marketplace is required. After subscribing, you will receive access to the necessary components and deployment instructions.
The specifics of accessing the container images and Helm chart depend on the chosen Kpow product:
Kpow Annual product:
Subscribing to the annual product provides access to the ECR (Elastic Container Registry) image and the corresponding Helm chart.
Kpow Hourly product:
For the hourly product, access to the ECR image will be provided and deployment utilizes the public Factor House Helm repository for installation.
Deploy an EKS cluster
We will use eksctl to provision an Amazon EKS cluster. The configuration for the cluster is defined in the manifests/eks/cluster.eksctl.yaml file within the repository.
Before creating the cluster, you must open this file and replace the placeholder values for <VPC-ID>, <PRIVATE-SUBNET-ID-* >, and <PUBLIC-SUBNET-ID-* > with your actual VPC and subnet IDs.
⚠️ The provided configuration assumes the EKS cluster will be deployed in the us-east-1 region. If you intend to use a different region, you must update the metadata.region field and ensure the availability zone keys under vpc.subnets (e.g., us-east-1a, us-east-1b) match the availability zones of the subnets in your chosen region.
Here is the content of the cluster.eksctl.yaml file:
Cluster Metadata: A cluster named fh-eks-cluster in the us-east-1 region.
VPC: Specifies an existing VPC and its public/private subnets where the cluster resources will be deployed.
IAM with OIDC: Enables the IAM OIDC provider, which allows Kubernetes service accounts to be associated with IAM roles. This is crucial for granting AWS permissions to your pods.
Service Accounts:
kpow-annual: Creates a service account for the Kpow Annual product. It attaches the AWSLicenseManagerConsumptionPolicy, allowing Kpow to validate its license with the AWS License Manager service.
kpow-hourly: Creates a service account for the Kpow Hourly product. It attaches the AWSMarketplaceMeteringRegisterUsage policy, which is required for reporting usage metrics to the AWS Marketplace.
Node Group: Defines a managed node group named ng-dev with t3.medium instances. The worker nodes will be placed in the private subnets (privateNetworking: true).
Once you have updated the YAML file with your networking details, run the following command to create the cluster. This process can take 15-20 minutes to complete.
eksctl create cluster -f cluster.eksctl.yaml
Once the cluster is created, eksctl automatically updates your kubeconfig file (usually located at ~/.kube/config) with the new cluster's connection details. This allows you to start interacting with your cluster immediately using kubectl.
kubectl get nodes
# NAME STATUS ROLES AGE VERSION
# ip-192-168-...-21.ec2.internal Ready <none> 2m15s v1.32.9-eks-113cf36
# ...
Launch a Kafka cluster
With the EKS cluster running, we will now launch an Apache Kafka cluster into it. We will use the Strimzi Kafka operator, which simplifies the process of running Kafka on Kubernetes.
Install the Strimzi operator
First, create a dedicated namespace for the Kafka cluster.
kubectl create namespace kafka
Next, download the Strimzi operator installation YAML. The repository already contains the file manifests/kafka/strimzi-cluster-operator-0.45.1.yaml, but the following commands show how it was downloaded and modified for this guide.
## Define the Strimzi version and download URL
STRIMZI_VERSION="0.45.1"DOWNLOAD_URL=https://github.com/strimzi/strimzi-kafka-operator/releases/download/$STRIMZI_VERSION/strimzi-cluster-operator-$STRIMZI_VERSION.yaml
## Download the operator manifest
curl -L -o manifests/kafka/strimzi-cluster-operator-$STRIMZI_VERSION.yaml ${DOWNLOAD_URL}
## Modify the manifest to install the operator in the 'kafka' namespace
sed -i 's/namespace: .*/namespace: kafka/' manifests/kafka/strimzi-cluster-operator-$STRIMZI_VERSION.yaml
Now, apply the manifest to install the Strimzi operator in your EKS cluster.
The configuration for our Kafka cluster is defined in manifests/kafka/kafka-cluster.yaml. It describes a simple, single-node cluster suitable for development, using ephemeral storage, meaning data will be lost if the pods restart.
After a few minutes, all the necessary pods and services for Kafka will be running. You can verify this by listing all resources in the kafka namespace.
kubectl get all -n kafka -o name
The output should look similar to this, showing the pods for Strimzi, Kafka, Zookeeper, and the associated services. The most important service for connecting applications is the Kafka bootstrap service.
Now that the EKS and Kafka clusters are running, we can deploy Kpow. This guide covers the deployment of both Kpow Annual and Kpow Hourly products. Both deployments will use a common set of configurations for connecting to Kafka and setting up authentication/authorization.
First, ensure you have a namespace for Kpow. The eksctl command we ran earlier already created the service accounts in the factorhouse namespace, so we will use that. If you hadn't created it, you would run kubectl create namespace factorhouse.
Create ConfigMaps
We will use two Kubernetes ConfigMaps to manage Kpow's configuration. This approach separates the core configuration from the Helm deployment values.
kpow-config-files: This ConfigMap holds file-based configurations, including RBAC policies, JAAS configuration, and user properties for authentication.
kpow-config: This ConfigMap provides environment variables to the Kpow container, such as the Kafka bootstrap address and settings to enable our authentication provider.
The contents of these files can be found in the repository at manifests/kpow/config-files.yaml and manifests/kpow/config.yaml.
kubectl get configmap -n factorhouse
# NAME DATA AGE
# kpow-config 5 ...
# kpow-config-files 3 ...
Deploy Kpow Annual
Download the Helm chart
The Helm chart for Kpow Annual is in a private Amazon ECR repository. First, authenticate your Helm client.
# Enable Helm's experimental support for OCI registries
export HELM_EXPERIMENTAL_OCI=1
# Log in to the AWS Marketplace ECR registry
aws ecr get-login-password \
--region us-east-1 | helm registry login \
--username AWS \
--password-stdin 709825985650.dkr.ecr.us-east-1.amazonaws.com
Next, pull and extract the chart.
# Create a directory, pull the chart, and extract it
mkdir -p awsmp-chart && cd awsmp-chart
# Pull the latest version of the Helm chart from ECR (add --version <x.x.x> to specify a version)
helm pull oci://709825985650.dkr.ecr.us-east-1.amazonaws.com/factor-house/kpow-aws-annualtar xf $(pwd)/* && find $(pwd) -maxdepth 1 -type f -delete
cd ..
Launch Kpow Annual
Now, install Kpow using Helm. We will reference the service account kpow-annual that was created during the EKS cluster setup, which has the required IAM policy for license management.
Note: The CPU and memory values are intentionally set low for this guide. For production environments, check the official documentation for recommended capacity.
Verify and access Kpow Annual
Check that the Kpow pod is running successfully.
kubectl get all -l app.kubernetes.io/instance=kpow-annual -n factorhouse
# NAME READY STATUS RESTARTS AGE
# pod/kpow-annual-kpow-aws-annual-c6bc849fb-zw5ww 0/1 Running 0 46s
# NAME TYPE CLUSTER-IP EXTERNAL-IP PORT(S) AGE
# service/kpow-annual-kpow-aws-annual ClusterIP 10.100.220.114 <none> 3000/TCP 47s
# ...
To access the UI, forward the service port to your local machine.
The Helm values are defined in values/eks-hourly.yaml.
# values/eks-hourly.yaml
env:
ENVIRONMENT_NAME: "Kafka from Kpow Hourly"envFromConfigMap: "kpow-config"volumeMounts:
# ... (volume configuration is the same as annual)
volumes:
# ...
resources:
# ...
Verify and access Kpow Hourly
Check that the Kpow pod is running.
kubectl get all -l app.kubernetes.io/instance=kpow-hourly -n factorhouse
# NAME READY STATUS RESTARTS AGE
# pod/kpow-hourly-kpow-aws-hourly-68869b6cb9-x9prf 0/1 Running 0 83s
# NAME TYPE CLUSTER-IP EXTERNAL-IP PORT(S) AGE
# service/kpow-hourly-kpow-aws-hourly ClusterIP 10.100.221.36 <none> 3000/TCP 85s
# ...
To access the UI, forward the service port to a different local port (e.g., 3001) to avoid conflicts.
In this guide, we have successfully deployed a complete, production-ready environment for monitoring Apache Kafka on AWS. By leveraging eksctl, we provisioned a robust EKS cluster with correctly configured IAM roles for service accounts, a critical step for secure integration with AWS services. We then deployed a Kafka cluster using the Strimzi operator, demonstrating the power of Kubernetes operators in simplifying complex stateful applications.
Finally, we walked through the deployment of both Kpow Annual and Kpow Hourly from the AWS Marketplace. This showcased the flexibility of Kpow's subscription models and their seamless integration with AWS for licensing and metering. You are now equipped with the knowledge to set up, configure, and manage Kpow on EKS, unlocking powerful insights and operational control over your Kafka ecosystem.
Teams, SMBs and large enterprises with advanced compliance & governance needs
Clusters
Unlimited
Features
- SSO and RBAC
- REST API
- Prometheus and Webhook (Slack, Teams) Integration
- Administrative Workflows and Audit Logs
Explore FLEX Free
Start with a 30-day Trial
Sign-up for a trial to evaluate our fully-featured, enterprise-ready Apache Flink UI free for 30-days in your business environment, or join the Factor House community to accelerate your individual Flink and Kafka development process.
Flex for Apache Flink will soon be available via the AWS Marketplace. With options to pay by the hour, monthly, or annually.
faqs
Frequently Ask Questions
Whether you’re an individual developer or a global enterprise, Flex scales to meet your needs. Flex integrates with Ververica Platform and Open Source Solutions.
Simplify Flink management with intuitive tools, real-time monitoring, and advanced analytics.
The free 30-day trial provides access to the full suite of enterprise-grade features, including RBAC, governance and audit logging.