
How-to
Empowering engineers with everything they need to build, monitor, and scale real-time data pipelines with confidence.
Heading 1
Heading 2
Heading 3
Heading 4
Heading 5
Heading 6
Lorem ipsum dolor sit amet, consectetur adipiscing elit, sed do eiusmod tempor incididunt ut labore et dolore magna aliqua. Ut enim ad minim veniam, quis nostrud exercitation ullamco laboris nisi ut aliquip ex ea commodo consequat. Duis aute irure dolor in reprehenderit in voluptate velit esse cillum dolore eu fugiat nulla pariatur.
Block quote
Ordered list
- Item 1
- Item 2
- Item 3
Unordered list
- Item A
- Item B
- Item C
Bold text
Emphasis
Superscript
Subscript
.webp)
Set Up Kpow with Confluent Cloud
A step-by-step guide to configuring Kpow with Confluent Cloud resources including Kafka clusters, Schema Registry, Kafka Connect, and ksqlDB.
Overview
Managing Apache Kafka within a platform like Confluent Cloud provides significant advantages in scalability and managed services.
This post details the process of integrating Kpow with Confluent Cloud resources such as Kafka brokers, Schema Registry, Kafka Connect, and ksqlDB. Once Kpow is up and running we will explore the powerful user interface to monitor and interact with our Confluent Cloud Kafka cluster.
About Factor House
Factor House is a leader in real-time data tooling, empowering engineers with innovative solutions for Apache Kafka® and Apache Flink®.
Our flagship product, Kpow for Apache Kafka, is the market-leading enterprise solution for Kafka management and monitoring.
Explore our live multi-cluster demo environment or grab a free Community license and dive into streaming tech on your laptop with Factor House Local.

Launch a Kpow Instance
To integrate Kpow with Confluent Cloud, we will first prepare a configuration file (e.g., confluent-trial.env). This file will define Kpow's connection settings to the Confluent Cloud resources and include Kpow license details. Before proceeding, confirm that a valid Kpow license is in place, whether we're using the Community or Enterprise edition.
The primary section of this configuration file details the connection settings Kpow needs to securely communicate with the Confluent Cloud environment, encompassing Kafka, Schema Registry, Kafka Connect, and ksqlDB.
To achieve the objectives outlined in this guide, where we explore enabling Kpow to monitor brokers and topics, as well as to create a topic, produce messages to it, and consume them from a Confluent Cloud cluster, the Kafka Cluster Connection section is mandatory. This section provides the fundamental parameters Kpow requires to establish a secure and authenticated link to the target Confluent Cloud environment. Without this vital configuration, Kpow will be unable to discover brokers, or perform any data operations such as creating topics, producing messages, or consuming them - which are the core functionalities we are setting out to configure in this walkthrough. The specific details required within this section, particularly the BOOTSTRAP server addresses and the API Key/Secret pair used within the SASL_JAAS_CONFIG (acting as username and password for SASL/PLAIN authentication), will be unique to the specific Confluent Cloud environment being configured. Comprehensive instructions on generating these API keys, understanding their associated permissions necessary for Kpow's operations, and locating the bootstrap server information for that environment can be found within the official Confluent Cloud documentation (for API keys) and guides on connecting clients.
Kafka Cluster Connection
ENVIRONMENT_NAME=Confluent Cloud: A label shown in the Kpow UI to identify this environment.BOOTSTRAP=<bootstrap-server-addresses>: The address(es) of the Kafka cluster's bootstrap servers. These are used by Kpow to discover brokers and establish a connection.SECURITY_PROTOCOL=SASL_SSL: Specifies that communication with the Kafka cluster uses SASL over SSL for secure authentication and encryption.SASL_MECHANISM=PLAIN: Indicates the use of the PLAIN mechanism for SASL authentication.SASL_JAAS_CONFIG=...: Contains the username and password used to authenticate with Confluent Cloud using the PLAIN mechanism.SSL_ENDPOINT_IDENTIFICATION_ALGORITHM=https: Ensures the broker's identity is verified via hostname verification, as required by Confluent Cloud.
API Key for Enhanced Confluent Features
CONFLUENT_API_KEYandCONFLUENT_API_SECRET: Used to authenticate with Confluent Cloud's REST APIs for additional metadata or control plane features.CONFLUENT_DISK_MODE=COMPLETE: Instructs Kpow to use full disk-based persistence, useful in managed cloud environments where Kpow runs remotely from the Kafka cluster.
Schema Registry Integration
SCHEMA_REGISTRY_NAME=...: Display name for the Schema Registry in the Kpow UI.SCHEMA_REGISTRY_URL=...: The HTTPS endpoint of the Confluent Schema Registry.SCHEMA_REGISTRY_AUTH=USER_INFO: Specifies the authentication method (in this case, basic user info).SCHEMA_REGISTRY_USER/SCHEMA_REGISTRY_PASSWORD: The credentials to authenticate with the Schema Registry.
Kafka Connect Integration
CONNECT_REST_URL=...: The URL of the Kafka Connect REST API.CONNECT_AUTH=BASIC: Indicates that basic authentication is used to secure the Connect endpoint.CONNECT_BASIC_AUTH_USER/CONNECT_BASIC_AUTH_PASS: The credentials for accessing the Kafka Connect REST interface.
ksqlDB Integration
KSQLDB_NAME=...: A label for the ksqlDB instance as shown in Kpow.KSQLDB_HOSTandKSQLDB_PORT: Define the location of the ksqlDB server.KSQLDB_USE_TLS=true: Enables secure communication with ksqlDB via TLS.KSQLDB_BASIC_AUTH_USER/KSQLDB_BASIC_AUTH_PASSWORD: Authentication credentials for ksqlDB.KSQLDB_USE_ALPN=true: Enables Application-Layer Protocol Negotiation (ALPN), which is typically required when connecting to Confluent-hosted ksqlDB endpoints over HTTPS.
The configuration file also includes Kpow license details, which, as mentioned, are necessary to activate and run Kpow.
## Confluent Cloud Configuration
ENVIRONMENT_NAME=Confluent Cloud
BOOTSTRAP=<bootstrap-server-addresses>
SECURITY_PROTOCOL=SASL_SSL
SASL_MECHANISM=PLAIN
SASL_JAAS_CONFIG=org.apache.kafka.common.security.plain.PlainLoginModule required username="username" password="password";
SSL_ENDPOINT_IDENTIFICATION_ALGORITHM=https
CONFLUENT_API_KEY=<confluent-api-key>
CONFLUENT_API_SECRET=<confluent-api-secret>
CONFLUENT_DISK_MODE=COMPLETE
SCHEMA_REGISTRY_NAME=Confluent Schema Registry
SCHEMA_REGISTRY_URL=<schema-registry-url>
SCHEMA_REGISTRY_AUTH=USER_INFO
SCHEMA_REGISTRY_USER=<schema-registry-username>
SCHEMA_REGISTRY_PASSWORD=<schema-registry-password>
CONNECT_REST_URL=<connect-rest-url>
CONNECT_AUTH=BASIC
CONNECT_BASIC_AUTH_USER=<connect-basic-auth-username>
CONNECT_BASIC_AUTH_PASS=<connect-basic-auth-password>
KSQLDB_NAME=Confluent ksqlDB
KSQLDB_HOST=<ksqldb-hose>
KSQLDB_PORT=443
KSQLDB_USE_TLS=true
KSQLDB_BASIC_AUTH_USER=<ksqldb-basic-auth-username>
KSQLDB_BASIC_AUTH_PASSWORD=<ksqldb-basic-auth-password>
KSQLDB_USE_ALPN=true
## Your License Details
LICENSE_ID=<license-id>
LICENSE_CODE=<license-code>
LICENSEE=<licensee>
LICENSE_EXPIRY=<license-expiry>
LICENSE_SIGNATURE=<license-signature>Once the confluent-trial.env file is prepared, we can launch the Kpow instance using the following docker run command:
docker run --pull=always -p 3000:3000 --name kpow \
--env-file confluent-trial.env -d factorhouse/kpow-ce:latestMonitor and Manage Resources
Once Kpow is launched, we can explore how it enables us to monitor brokers, create a topic, produce a message to it, and observe that message being consumed, all within its user-friendly UI.

Conclusion
By following these steps, we've successfully launched Kpow with Docker and established its connection to our Confluent Cloud. The key to this was our confluent-trial.env file, where we defined Kpow's license details and the essential connection settings for Kafka, Schema Registry, Kafka Connect, and ksqlDB.
The subsequent demonstration highlighted Kpow's intuitive user interface and its core capabilities, allowing us to effortlessly monitor Kafka brokers, create topics, produce messages, and observe their consumption within our Confluent Cloud cluster. This integrated setup not only simplifies the operational aspects of managing Kafka in the cloud but also empowers users with deep visibility and control, ultimately leading to more robust and efficient event streaming architectures. With Kpow connected to Confluent Cloud, we are now well-equipped to manage and optimize Kafka deployments effectively.
Heading 1
Heading 2
Heading 3
Heading 4
Heading 5
Heading 6
Lorem ipsum dolor sit amet, consectetur adipiscing elit, sed do eiusmod tempor incididunt ut labore et dolore magna aliqua. Ut enim ad minim veniam, quis nostrud exercitation ullamco laboris nisi ut aliquip ex ea commodo consequat. Duis aute irure dolor in reprehenderit in voluptate velit esse cillum dolore eu fugiat nulla pariatur.
Block quote
Ordered list
- Item 1
- Item 2
- Item 3
Unordered list
- Item A
- Item B
- Item C
Bold text
Emphasis
Superscript
Subscript

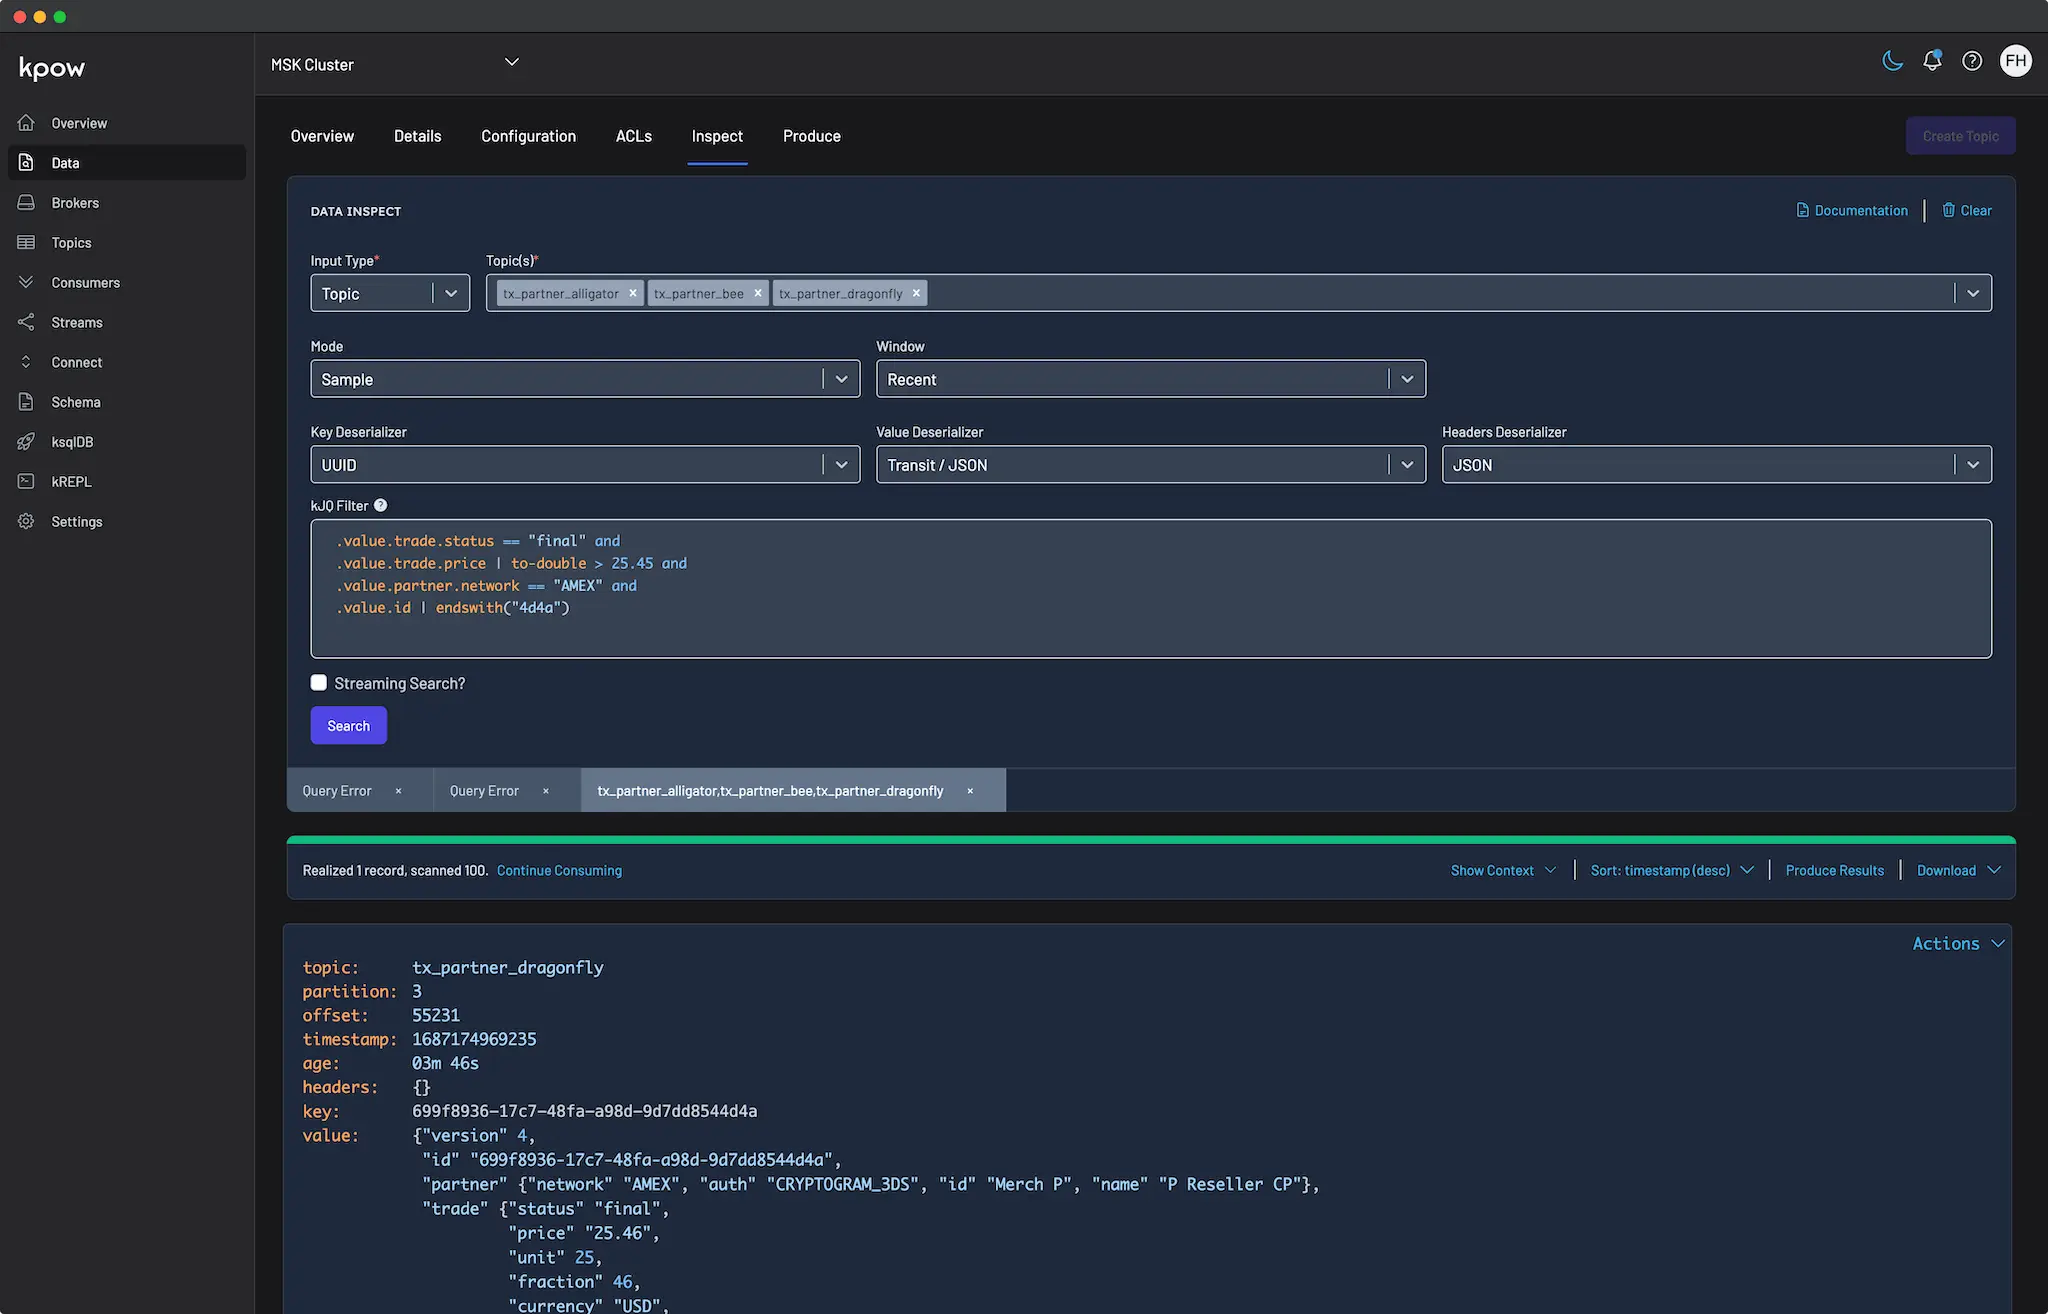
How to query a Kafka topic
Querying Kafka topics is a critical task for engineers working on data streaming applications, but it can often be a complex and time-consuming process. Enter Kpow's data inspect feature—designed to simplify and optimize Kafka topic queries, making it an essential tool for professionals working with Apache Kafka.
Introduction
Querying Kafka topics is a critical task for engineers working on data streaming applications, but it can often be a complex and time-consuming process.
Whether you're a developer prototyping a new feature or an infrastructure engineer ensuring the stability of a production environment, having a powerful querying tool at your disposal can make all the difference. Enter Kpow's data inspect feature—designed to simplify and optimize Kafka topic queries, making it an essential tool for professionals working with Apache Kafka.
Overview
Apache Kafka and its ecosystem have emerged as the cornerstone of modern data-in-motion solutions. Our customers leverage a variety of technologies, including Kafka Streams, Apache Flink, Kafka Connect, and custom services using Java, Go, or Python, to build their data streaming applications.
Regardless of the technology stack, engineers need reliable tools to examine the foundational Kafka topics in their streaming applications. This is where Kpow's data inspect feature comes into play. Data inspect offers ad hoc, bounded queries across Kafka topics, proving valuable in both development and production scenarios. Here’s how it can be particularly useful:
Key use cases in development
- Validating data structures: Verifying and validating the shape of data (both key and value) during the prototyping phase.
- Monitoring message flow: Ensuring that messages are flowing to the topic as expected and that topic message distribution is well balanced across all partitions.
- Debugging and troubleshooting: Identifying and resolving issues in the development phase. For example validating that your topic's configuration is applying its compaction policy as expected or that segments are being deleted as expected.
Critical applications in production
- Identifying poison messages: Quickly identifying and addressing messages that can cause downstream issues that may have caused consumer groups to break.
- Reconciliation and Analytics: Querying for specific events for reconciliation or analytic purposes.
- Monitoring and Alerting: Keeping track of Kafka topics for anomalies or unusual activity.
- Compliance and Auditing: Ensuring compliance with data governance standards and auditing access to sensitive data.
- Capacity Planning: Planning and scaling infrastructure based on the volume and velocity of data flowing through topics.
This article will dive into the technical details of Kpow's data inspect query engine and how you can maximise your own querying in Kafka. Whether you're a developer looking to validate data during development or part of the infrastructure team tasked with ensuring the stability and performance of your production Kafka clusters, data inspect offers a powerful set of tools to help you get the most out of your Kafka deployments.
Introduction to Data Inspect
Kpow’s data inspect gives teams the ability to perform bounded queries across one or more Kafka topics. A bounded query retrieves a specific range or subset of data from a Kafka topic, informed by user input through the data inspect form. Users can specify:
- A Date Range: An ISO 8601 date range specifying the start and end bounds of the query.
- An Offset Range: The start offset from where you'd like the query to begin (especially useful when searching against a partition or key).
Kpow’s data inspect form simplifies the querying process by offering common query options as defaults. For instance, to view the most recent messages in a topic, Kpow's default query window is set to 'Recent' (e.g., the last 15 minutes). Users can also specify custom date times or timestamps for more fine-grained queries.
Additionally, the data inspect form allows input of topic SerDes and any filters to apply against the result set, which will be explained below.

The Query Plan
Once all inputs are provided, Kpow constructs a query plan similar to that of a SQL engine. This plan optimizes the execution of the query and efficiently parallelizes queries across a pool of consumer groups. It’s this query engine that powers Kpow’s blazingly fast multi-topic search.
The query engine ensures an even distribution of records from all topic partitions when querying. An even distribution is crucial for understanding a topic's performance because it ensures that the analysis is based on a representative sample of the data. If certain partitions are overrepresented, the analysis may be skewed, leading to inaccurate insights.
The cursors table, part of the data inspect result metadata, displays the comprehensive progress of the query, detailing the start and end offsets for each topic partition, the number of records scanned, and the remaining offsets to query.

We understand your data
Kpow supports a wide-array of commonly used data formats (known as SerDes). These formats include:
- JSON
- AVRO
- JSON Schema
- Protobuf
- Clojure formats such as EDN or Transit/JSON
- XML, YAML and raw strings
Kpow integrates with both Confluent's Schema Registry and AWS Glue. Our documentation has guides on how you can configure Kpow's Schema Registry integration.
If we don't support a data format you use (for example you use Protobuf with your own encryption-at-rest) you can import your own custom SerDes to use with Kpow. Visit our documentation to learn more about custom SerDes.
jq filters for Kafka
No matter which message format you use, filtering messages in Kpow works transparently across every deserializer.
kJQ is the filtering engine we have built at Kpow. It's a subset of the jq programming language built specifically for Kafka workloads, and is embedded within Kpow's data inspect.
jq is like sed for JSON data - you can use it to slice and filter and map and transform structured data with the same ease that sed, awk, grep and friends let you play with text.
Instead of creating yet another bespoke querying language that our customers would have to learn, we chose jq, one of the most concise, powerful, and immediately familiar querying languages available.
An example of a kJQ query:
.key.currency == "GBP" and
.value.tx.price | to-double < 16.50 and
.value.tx.pan | endswith("8649")If you are unfamiliar with jq, or want to learn more we generally recommend the following resources:
- jq playground: an online interactive playground for jq filters.
- Kpow's kREPL: Kpow has a built in REPL. It is our programmatic interface into Kpow's data inspect functionality. Within the kREPL you can experiment with kJQ queries - much like the jq playground.
- Kpow's kJQ documentation: a quick guide on kJQ's grammar, including examples.
While the kREPL is out of scope for this blog post, stay tuned for future articles where we’ll take a deep dive into how you can use kJQ to construct sophisticated filters and data transformations right within Kpow.
Enterprise security built-in
Filtering data is only part of the equation. In order to perform ad-hoc queries against production data, Kpow provides enterprise-grade security features:
Role-Based Access Control (RBAC)
Kpow’s declarative RBAC system is defined in a YAML file, where you can assign policies to user roles authenticated from an external identity provider (IdP). This allows you to permit or deny access to Kafka topics based on user roles.
For example:
policies:
- resource: [ "cluster", "confluent-cloud1", "topic", "tx_trade_*" ]
effect: "Allow"
actions: [ "TOPIC_INSPECT" ]
role: "dev"
- resource: [ "*" ]
effect: "Allow"
actions: [ "TOPIC_INSPECT" ]
role: "admin"The above RBAC policy defines that:
- Any user assigned to the
devrole will have access to any topic starting withtx_trade_*for only theconfluent-cloud1cluster. All other topics will be implicitly denied. - Any user assigned to the
adminrole will have access to all topics for all clusters managed by Kpow. - All other users are implicitly denied access to data inspect functionality.
Data Masking
In environments where compliance with PII requirements is mandatory, data masking is essential. Kpow’s data masking feature allows you to define policies specifying which fields in a message should be redacted in the key, value, or headers of a record. These policies apply to nested data structures or arrays within messages. For instance, a policy might:
- Show only the last 4 characters of a field (ShowLast4)
- Show only the email host (ShowEmailHost)
- Return a SHA hash of the contents (SHAHash)
- Fully redact the contents (Full)
Kpow provides a data masking sandbox where users can validate policies against test data, ensuring that redaction methods work as expected before deploying them.

Data Governance
Maintaining a comprehensive audit log is crucial for ensuring data governance and regulatory compliance. Kpow's audit log records all queries performed against topics, providing a detailed trail of who accessed the data, what topics were accessed, and when the query occurred. This information is vital for monitoring and enforcing data security policies, detecting unauthorized access, and demonstrating compliance with regulations such as GDPR, HIPAA, or PCI DSS. Within Kpow’s admin UI, navigate to the "Audit Log" page and then to the "Queries" tab to view all queries performed using Kpow.
Within Kpow's admin UI you can navigate to the "Audit log" page and then to the "Queries" tab to view all queries that have been performed using Kpow.

Getting started today
Kpow's data inspect feature revolutionizes the way professionals work with Apache Kafka, offering a comprehensive toolkit for querying Kafka topics with ease and efficiency. Whether you're validating data structures, monitoring message flow, or troubleshooting issues, Kpow provides the tools you need to streamline your workflow and optimize your Kafka-based applications.
Ready to take your Kafka querying to the next level? Sign up for Kpow's free community edition today and start exploring the power of Kpow's data inspect feature. Experience firsthand why Kpow is the number one toolkit for Apache Kafka and unlock new possibilities for managing and optimizing your Kafka clusters.
Heading 1
Heading 2
Heading 3
Heading 4
Heading 5
Heading 6
Lorem ipsum dolor sit amet, consectetur adipiscing elit, sed do eiusmod tempor incididunt ut labore et dolore magna aliqua. Ut enim ad minim veniam, quis nostrud exercitation ullamco laboris nisi ut aliquip ex ea commodo consequat. Duis aute irure dolor in reprehenderit in voluptate velit esse cillum dolore eu fugiat nulla pariatur.
Block quote
Ordered list
- Item 1
- Item 2
- Item 3
Unordered list
- Item A
- Item B
- Item C
Bold text
Emphasis
Superscript
Subscript

Delete Records in Kafka
This article provides a step-by-step guide on the various ways to delete records in Kafka.
This article dives into the various ways you can delete records in Kafka
Overview
Have you ever wondered how to effectively delete records in a Kafka topic? Well, there are actually several ways to do it, each with their own implications and granularity.
In this article, we'll explore these different approaches in detail, from the complete deletion of a topic to the more granular erasure of individual records. Understanding these methods is essential for anyone working with Kafka, as it can have significant implications for data retention, storage, and processing. By the end of this article, you'll have a better understanding of the different methods available for record deletion in Kafka, and how to choose the best approach for your specific use case.
About Kpow
This article uses Kpow for Apache Kafka as a companion to demonstrate how you can delete records in Kafka.
Kpow is a powerful tool that makes it easy to manage and monitor Kafka clusters, and its intuitive user interface simplifies the process of deleting records.
Explore with the live multi-cluster demo environment or grab the free community edition of Kpow and get to work deleting records in your own Kafka cluster. If you need a Kafka cluster to play with, check out our local Docker Compose environment to spin up Kpow along side a 3-node Kafka cluster on your machine.
1. Deleting Topics
The most blunt and impactful way of deleting records on a Kafka cluster is by deleting the topic that contains the records.
While this can be an effective way to remove all data associated with a topic, it's important to note that this action is permanent and irreversible. Once a topic is deleted, all data will no longer be available, and any running applications that depend on this topic will likely throw exceptions. If topic auto-create is enabled on the broker, the topic could even get created again with the default topic configuration, potentially causing data loss or other issues.
Despite these risks, there may be cases where deleting a Kafka topic is necessary, such as when the topic is no longer needed or contains sensitive data that must be removed. Much like dropping a table in a traditional relational database, it's important to proceed with caution and have a clear understanding of the potential impacts before deleting a topic.
Deleting topics is simple in Kpow!
Navigate to Topic -> Details in the UI and select the topic you wish to delete.

The result of deleting topics in Kpow (like all other actions) gets persisted to Kpow's audit log for data governance. Kpow also provides a Slack webhook integration to notify a channel when the deletion of a topic has been performed.
2. Truncating Records
Truncating records is another method for deleting data from a Kafka topic, specifically a range of records from a topic partition. Truncation removes all records before a specified offset for a given topic partition. This can be useful when you want to remove a specific range of records without deleting the entire topic.
How topic partitions work in Kafka
In Kafka, all topic partitions have a start and end offset.
The start offset is the offset of the very first record on the topic partition. A fresh topic partition will have a start offset of 0. However, because of topic retention, cleanup policies, or even truncation, the start offset could be any value over time.
And similarly, the end offset is always the last record on a topic partition. The end offset is forever growing as producers write more records to a topic.
One thing to note: producing a single record may not result in a simple increment of the end offset. For example, transactional producers write additional metadata records when committing.
Viewing the start and end offsets inside Kpow is easy! Simply navigate to the topic partitions table in Topic -> Details and select the start and end offset columns.

An example of truncation
Consider a topic partition with 6 records. The start offset is 0 and the end offset is 5.
If we make a request to truncate a topic partition before offset 3, all records highlighted in gray will be deleted.
After we have performed this action the new start offset will be 3 and the end offset will remain as 5.
Truncating records in Kpow
Kpow provides a convenient way to truncate topics with its intuitive UI.
To truncate a topic in Kpow, simply follow these steps:
- Navigate to the topic you want to truncate in the UI.
- Select the partitions you want to truncate.
- Choose to truncate by either the last observed end offset or by group offset.
- Click "Truncate" to delete the specified range of records from the topic.
- By default, Kpow populates the last observed end offset of each partition in the form. This will delete all records up to and including the specified offset.
Alternatively, you can choose to truncate by group offset, which deletes all records a consumer group has consumed. This has the advantage of not impacting the correctness/behavior of the consumer group, by only deleting records it has read.
It's important to note that truncating a topic is a destructive action and requires careful consideration. If multiple consumers are reading from the topic, truncating by group offset could impact the other consumers.

Implications of truncating a topic
Truncating a topic in Kafka is a less intrusive way of deleting records than deleting the topic entirely. This is because the topic configuration, including the number of partitions and replicas, remains unchanged. Additionally, you have more granular control over which records get deleted.
However, it's important to note that truncating a topic is a destructive action that requires careful consideration. In particular, truncating a topic can cause data loss and may impact the behavior of any consumers reading from the affected partitions.
As a best practice, it's generally recommended to rely on the semantics of how you configure a topic to manage topic growth, rather than resorting to truncation. For example, you can use the retention.ms configuration parameter to automatically age out data after a certain period of time, or configure a cleanup policy to remove old or irrelevant data. This blog post covers how these retention policies work in Kafka. How these get configured will depend on the use case of your topic.
That said, there are still valid reasons to truncate a topic on a running Kafka cluster. For instance, you may want to reset a topic to a specific state for testing or debugging purposes, or you may have encountered a production issue that requires you to delete a range of records from a topic. In these cases, truncation can be a useful tool.
If you do decide to truncate a topic, it's important to be aware of the potential impacts on your Kafka cluster and consumers. For example, truncating a topic may cause consumers to experience data gaps or inconsistencies. As a best practice, you should always test truncation in a non-production environment before running it in a production context.
3. Tombstoning Records
The final and most granular way of a deleting record in Kafka is via tombstoning. Tombstoning deletes an individual record based on its key.
How tombstoning works in Kafka
Tombstoning works by producing a record with a null value and the key of the record that needs to be deleted to a topic. Note: null in this case means a value of 0 bytes. For example, producing the value null with a JSON serializer will not have the same effect.
Tombstoning allows you to delete individual records from a topic without affecting the rest of the data in the topic.
Note: tombstoning will only work when the topic has been configured with a compact.policy of compact or compact,delete.
Compacted topics
Compacted topics in Kafka ensure that only the latest record per message key is retained within the log of data for a single topic partition. This policy is useful for implementing key/value stores or aggregated views where only the most recent state is needed.
For example, a KTable that holds the latest count of Covid-19 cases by country, where each record is keyed by the country, would benefit from a compacted topic.
It is important to note that compaction does not happen automatically and how often it happens depends on your topic and broker configuration. Therefore, deletion does not occur automatically after a tombstone record is produced.
This blog post goes into finer details about the different broker/topic configuration that can have an impact on when compaction happens.
Producing tombstone messages in Kpow
First, we can ensure that compaction has been enabled on our topic by navigating to the Topic Configuration table and selecting our topic and the config value cleanup.policy.

If cleanup.policy hasn't been correctly set, we can click the pencil icon to edit the topic configuration and set it to compact,delete.
Next, navigate to Kpow's Data Produce UI and select None for the value serializer while specifying the key you wish to delete.

Done! You have successfully produced a tombstone message!
Querying for data to be deleted
We can use Kpow to query for data we want to tombstone on a topic.
For example. Consider a topic that contains the following data:
{
"name": "John Smith",
"score": 10,
"expires": "2022-10-10"
}Let's say we want to query for all records that have expired, we could write a kJQ query like so:
.value.expires | from-date < nowkJQ is Kpow's powerful query language for searching data on a Kafka topic. It is our implementation of the jq language with added features built specifically for Kafka.
The above query parses the expires field as an ISO 8601 date time and checks if its before the current date time (now). now will get resolved as the current date during query execution time.
After executing this query in Kpow, we can see a list of results that match our filtered query. These are the expired records!

We can now click the 'Produce results' button and produce these records back to the topic as tombstones, by selecting the value serializer as None.
Done! We have managed to delete a collection of records based on a query filter.
Conclusion
In this article we have demonstrated the various ways you can delete records in Kafka using Kpow.
You should now have a better understanding of deletion, understanding the different implications between each method, and when they might be applicable to use.
Get started with the free community edition of Kpow today!
Heading 1
Heading 2
Heading 3
Heading 4
Heading 5
Heading 6
Lorem ipsum dolor sit amet, consectetur adipiscing elit, sed do eiusmod tempor incididunt ut labore et dolore magna aliqua. Ut enim ad minim veniam, quis nostrud exercitation ullamco laboris nisi ut aliquip ex ea commodo consequat. Duis aute irure dolor in reprehenderit in voluptate velit esse cillum dolore eu fugiat nulla pariatur.
Block quote
Ordered list
- Item 1
- Item 2
- Item 3
Unordered list
- Item A
- Item B
- Item C
Bold text
Emphasis
Superscript
Subscript

Manage Kafka Visibility with Multi-Tenancy
This article teaches you how to configure Kpow to restrict visibility of Kafka resources with Multi-Tenancy.
Kpow provides sophisticated Role Based Access Control to allow, deny, or stage user actions for any Kafka resource, to a group or topic level. However, for some of our users controlling the actions that a user can take wasn't quite enough.
"I have hundreds of topics and groups, showing users all of them is confusing. Can I restrict visibility of resources with RBAC?"
The best part of working on Kpow is understanding the needs of engineering teams who use Apache Kafka. On the face of it using RBAC to restrict user visibility as well control of resources is reasonable, but when we considered the broader idea we understood this is a bigger problem.
Introducing Multi-Tenancy
Kpow Multi-Tenancy allows you to assign user roles to one or more tenants.
Each tenant explicitly includes or excludes resources such as Kafka Clusters, Groups, Topics, Schema Registries and Connect Clusters.
A user role may be assigned multiple tenants, and a user with multiple tenants has the ability to easily switch between them.

When operating within a tenant a user can only see resources included by that tenant or create resources that would be valid within that tenant.
Importantly, users will see a fully consistent synthetic cluster-view of their aggregated resources. The overall user experience is simply of a restricted set of Kafka resources as if they were truly the only resources in the system.
Now our user with hundreds of groups and topics can configure views for different business units and provide a simplified Kafka experience to their users.
Tenants In Action
Let's start at the end, below you can see the Broker UI of two different tenants operating in the one Kpow instance:
- Global tenant is configured to contain all resources
- Transaction tenant is configured to contain only topics starting with
tx_*
Global Tenant UI
We can see 233 topics in the global tenant.

Transaction Tenant UI
The transaction tenant only shows 200 topics, and they are much more uniform.

A user can switch between these two tenants if they have roles with each tenant assigned. Kpow continues to observe and control all attached Kafka resources, but provides a consistent view of synthetic clusters constructed of only the groups and topics included in each tenant. Aggregated metrics like write/s and total disk space can be seen in either view with different figures.
Uses of Multi-Tenancy
The primary intended use of Multi-Tenancy is for you to provide restricted views of Kafka resources to users from different teams in your organization.
However with the growth of Managed Kafka Services you may also want to configure basic tenants that exclude topics and groups of no regular interest.
Kpow stores all information regarding your Kafka resources in internal topics within your cluster, including an audit log of user actions. Kpow is also constructed of two Kafka Streams applications that run in unison to build the telemetry presented back to you.
A common user request has been to hide these internal topics and groups in the general UI as they're not of interest to our end users. Previously this had been a complicated task of in-place exclusion in the front-end, but aggregated metrics were hard to achieve.
If you have no tenants configured Kpow automatically provides two. A Global tenant that shows all attached Kafka resources and a Kpow Hidden tenant that hides Kpow resources and the consumer offsets topic.
You may want to provide tenants for specific business units, or you might just want to exclude internal topics from your cloud or managed service provider, or both!
Get Started
Multi-Tenancy is related to Role Based Access Control and both require User Authentication which is not available to trial users.
If you are on trial and would like to explore any of these features please request a license upgrade from sales@factorhouse.io.
Configuration
Within your RBAC yaml configuration file you can specify a top-level tenants key:
The following example configuration matches the default tenants that Kpow provides if you have none configured.
tenants:
- name: "Global"
description: "All configured Kafka resources."
resources:
- include:
- [ "*" ]
roles:
- "*"
- name: "Kpow Hidden"
description: "All configured Kafka resources except internal Kpow resources and __consumer_offsets."
resources:
- include:
- [ "*" ]
- exclude:
- [ "cluster", "*", "topic", "oprtr*" ]
- [ "cluster", "*", "topic", "__oprtr*" ]
- [ "cluster", "*", "topic", "__consumer_offsets" ]
- [ "cluster", "*", "group", "oprtr*" ]
roles:
- "*"For more information about Multi-Tenancy see our online documentation, for help contact support@factorhouse.io.
Heading 1
Heading 2
Heading 3
Heading 4
Heading 5
Heading 6
Lorem ipsum dolor sit amet, consectetur adipiscing elit, sed do eiusmod tempor incididunt ut labore et dolore magna aliqua. Ut enim ad minim veniam, quis nostrud exercitation ullamco laboris nisi ut aliquip ex ea commodo consequat. Duis aute irure dolor in reprehenderit in voluptate velit esse cillum dolore eu fugiat nulla pariatur.
Block quote
Ordered list
- Item 1
- Item 2
- Item 3
Unordered list
- Item A
- Item B
- Item C
Bold text
Emphasis
Superscript
Subscript

Manage Temporary Access to Kafka Resources
Temporary policies allow Admins the ability to assign access control policies for a fixed duration. This blog post introduces temporary policies with an all-to-common real-world scenario.
This article introduces Kpow for Apache Kafka®'s new Temporary Policies feature.
Introducing Temporary Policies
Introduced to the Kpow Kafka Management and Monitoring toolkit in v79 is the ability to Stage Mutations , create Temporary Role Based Access Control Policies (temporary policies), and a suite of new admin features giving greater control over Kpow to Admin Users.
This blog post introduces temporary policies through the lense of a common real-world scenario.
Temporary policies allow Admins the ability to assign access control policies for a fixed duration. A common use-case would be providing a user TOPIC_INSPECT access to read data from a topic for an hour while resolving an issue in a Production environment.
Temporary Policies Use Case
You wake up one morning to a dreaded sight: a poison message has taken down one of your services.
Your team decides the simplest solution is to skip the message by incrementing your consumer group's offset for the topic.
Now here's the problem. Access to production is limited, and for such a simple action (incrementing the offset), a team member generally must jump through the hoops of configuring the VPN, connecting to the jumpbox, and making sure they execute the right combination of bash commands against the Kafka cluster.
Often these operations are unnecessarily time-consuming, brittle, and frustrating in a time-critical moment when you need to restore production access. Furthermore, the jumpbox generally has full access to the Kafka cluster, and there is no audit log recording the actions being committed.
In combination with Kpow's existing Role-Based Access Controls and powerful mutation actions, Temporary Policies improve this experience by giving teams the tools they need to easily effect change in a secured environment, like production, when things go wrong.
Configuring Role-Based Access Control
In this example, two roles are coming from our Identity provider: devs and owners.
We will assign anyone with the role owners admin access, and give them GROUP_EDIT access to the production cluster.
The devs role will be implicitly denied from undertaking any action against the cluster, but are authorized for read-only access to view the production cluster in Kpow.
Our example RBAC yaml file might look something like:
admin_roles:
- "owners"
authorized_roles:
- "owners"
- "devs"
policies:
-
actions:
- GROUP_EDIT
effect: Allow
resource:
- "*"
role: "owners"This configuration prevents regular developers from making changes against the production cluster.
The Poison Pill
Today is the day when your team has to fix the consumer group on the production cluster.
Everyone has been briefed on the plan, and it has been decided that the team lead will temporarily grant the devs role Allow access for GROUP_EDIT. This will enable one of the developers on the team to make the required change to the production cluster.
This has been done through the Temporary Policies section of Kpow's settings UI:

Once a temporary policy has been created, team members can be notified via Slack with the Kpow Slack integration.
Incrementing the offset
A team member has been tasked with the job of incrementing the offset of the consumer group for the problematic topic.
The developer looks to the application logs and notices that it is partition 3 of topic tx_trade1 that contains the poison message.
The erroring consumer group is named trade_b2.
The developer then opens Kpow, navigates to the "Workflows" tab, and selects the consumer group.
From within the consumer group view, the dev clicks on the partition and selects "Skip Offset".
This action will schedule the mutation, and once someone on the team scales down the trade_b2 service, the offset will be incremented.

Post-Mortem
Kpow also provides valuable information and insights for teams to use after a production incident when you are completing your incident post-mortem.
Kpow has an Audit Log for Data Governance, and all the actions undertaken to resolve any production incident are persisted in Kpow's audit log topic. Meaning you can use the Audit Log to see the recorded history of all actions taken to restore the production service.

Inspecting the audit log message reveals the offset that was skipped.

You can use Kpow's data inspect functionality to view the poison message to help investigate why that message took down the consumer group.

You can find further information on setting up, viewing and managing temporary policies here.
Further reading/references
Explore our documentation to learn more about the Kpow's features mentioned in this article:
You might also be interested in the following articles:
Manage, Monitor and Learn Apache Kafka with Kpow by Factor House.
We know how easy Apache Kafka® can be with the right tools. We built Kpow to make the developer experience with Kafka simple and enjoyable, and to save businesses time and money while growing their Kafka expertise. A single Docker container or JAR file that installs in minutes, Kpow's unique Kafka UI gives you instant visibility of your clusters and immediate access to your data.
Kpow is compatible with Apache Kafka+1.0, Red Hat AMQ Streams, Amazon MSK, Instaclustr, Aiven, Vectorized, Azure Event Hubs, Confluent Platform, and Confluent Cloud.
Start with a free 30-day trial and solve your Kafka issues within minutes.
Heading 1
Heading 2
Heading 3
Heading 4
Heading 5
Heading 6
Lorem ipsum dolor sit amet, consectetur adipiscing elit, sed do eiusmod tempor incididunt ut labore et dolore magna aliqua. Ut enim ad minim veniam, quis nostrud exercitation ullamco laboris nisi ut aliquip ex ea commodo consequat. Duis aute irure dolor in reprehenderit in voluptate velit esse cillum dolore eu fugiat nulla pariatur.
Block quote
Ordered list
- Item 1
- Item 2
- Item 3
Unordered list
- Item A
- Item B
- Item C
Bold text
Emphasis
Superscript
Subscript

Deploy Clojure Projects to Maven Central with Leiningen
This article provides a step-by-step guide to how we deploy the Kpow Kafka Streams Monitoring Agent to Maven Central with Leiningen.
This article dives into deploying Clojure projects to Maven.
Maven Central and Clojure
We have just released our first open-source consumable: kpow-streams-agent, a monitoring tool for Kafka Streams, to Maven Central.
The Kpow Streams Agent integrates your Kafka Streams topologies with Kpow, offering near-realtime monitoring and visualisation of your streaming compute:

We intend for this software to be used by the wider JVM ecosystem (eg, Java, Kotlin, Scala), so would like our library to be available on Maven Central.
There weren't many resources online documenting anyone's experience deploying Clojure-centric software to Maven Central and the few resources that I came across were out of date with the current requirements (as of June 2021).
This blog post documents the steps needed to make your Clojure code available to a wider audience.
Create a Sonatype account
The entire process for claiming your own namespace on Maven Central starts with creating a JIRA ticket. This seemed a bit archaic to us, coming from Clojars, NPM, and Crates.io backgrounds. Certainly, with these modern package managers, the integration between language/ecosystem/registry seems a lot more streamlined, thus publishing software much easier.
We weren't sure if this would be an automated process or if we would have to wait for a human to manually approve our request. We were relieved that it was indeed somewhat automated, with a bot automatically approving each step.
Sign up to JIRA
The first step is to create an account on the Sonatype JIRA.
The credentials you provide here will also be the same credentials you use to deploy, so keep that in mind as you proceed.
Create a new ticket
Once you have signed up for the JIRA, create a new ticket and choose the issue type "New Project".
This is where you claim your group.id on Maven Central. This must be related to a website domain you own. For us, we claimed io.operatr as our companies domain is operatr.io. You will need to prove ownership of your domain for the next section.

Add a TXT entry to your domain
Once you have submitted your JIRA ticket, a bot should automatically reply to your issue within a few minutes asking for verification of your domain. The simplest way to verify your domain is to create a TXT entry.
For example, if you use Cloudflare to manage your DNS records you could follow these steps to add a TXT entry to your domain.
You will need to create a TXT entry containing the Jira issue ID of your ticket (for example OSSRH-70400)
Once you have added the TXT entry to your domain, the bot should automatically reply and confirm that your group.id has been prepared
Deploy Requirements
You will now be granted the ability to deploy snapshot and release artifacts to s01.oss.sonatype.org for the group.id you have just registered.
All artifacts you deploy here are staged and can only be promoted to Maven Central if they meet the requirements.
This section will document how you can configure your project.clj to meet the Sonatype requirements
GPG Keys
Firstly, we want to create a GPG key to sign our release. Lein's GPG Guide is a good starting place on how you can do that.
Once you have created your GPG key you will need to upload your public key to a keyserver, such as https://keyserver.ubuntu.com/
In order to do this, you can export your GPG public key with the following command:
gpg --armor --export $MY_EMAILCredentials
Next, you will need to update your ~/.lein/credentials.clj file to include your Sonatype credentials:
{#"https://s01.oss.sonatype.org/.*" {:username "JIRA_USERNAME" :password "JIRA_PASSWORD"}}Once you have created credentials.clj you will need to encrypt it:
gpg --default-recipient-self -e \
~/.lein/credentials.clj > ~/.lein/credentials.clj.gpgFinally, you will need to setup the correct :deploy-repositories within your project's project.clj:
:deploy-repositories [["releases" {:url "https://s01.oss.sonatype.org/service/local/staging/deploy/maven2/"
:creds :gpg}
"snapshots" {:url "https://s01.oss.sonatype.org/content/repositories/snapshots/"
:creds :gpg}]]Source and Javadoc Jars
It is a requirement to include both a -sources.jar and -javadoc.jar jar as part of your deployment.
These requirements are tailored more towards Java codebases than Clojure:
If, for some reason (for example, license issue or it's a Scala project), you can not provide -sources.jar or -javadoc.jar , please make fake -sources.jar or -javadoc.jar with simple README inside to pass the checking
You can create -sources.jar and -javadoc.jar jars by using a :classifiers key in lein:
:classifiers [["sources" {:source-paths ^:replace []
:java-source-paths ^:replace ["src/java"]
:resource-paths ^:replace []}]
["javadoc" {:source-paths ^:replace []
:java-source-paths ^:replace []
:resource-paths ^:replace ["javadoc"]}]]This specific example will bundle Java source code in the sources jar, and Java docs in the javadoc jar.
If you intend to create "fake" source jars, you could leave the source paths and resource paths empty.
Project Details
In order to meet the Project name, description and URL requirements, you will need to correctly populate the following keys in project.clj:
:description "A Clojure project deployed to Maven"
:url "https://github.com/org/repo"License Information
In order to meet the License information requirement you will need to correctly populate the :license key in project.clj:
:license {:name "Apache-2.0 License"
:url "https://www.apache.org/licenses/LICENSE-2.0"
:distribution :repo
:comments "same as Kafka"}Developer Information
In order to meet the Developer Information requirement you will need to correctly structure your :pom-additions key in project.clj like so:
:pom-addition ([:developers
[:developer
[:id "johnsmith"]
[:name "John Smith"]
[:url "https://mycorp.org"]
[:roles
[:role "developer"]
[:role "maintainer"]]]])SCM Information
In order to meet the SCM Information requirement, you will need to correctly populate the :scm key in project.clj like so:
:scm {:name "git" :url "https://github.com/org/repo"}Deploying to Central
If you have followed all of the steps from the previous section, you should have a lein project that meets all Sonatype requirements and is ready to be deployed!
You can do this via a regular:
lein deployOnce you have deployed your artifacts, the next step is to log in to the Nexus Repository Manager at https://s01.oss.sonatype.org/. Again, your JIRA credentials from before are used to log in.
Once inside the, navigate to "Staging Repositories" - you should see an entry labeled XXX-1000.
Click on this item and verify that the contents you wish to deploy to Central are present.
If everything looks good, click the "Close" button. This will trigger the requirements check

If the requirements check passes, you will be able to press the "Release" button. Once you press this button, your release will shortly be synced with Maven Central!
Note : It can take up to 4 hours for the sync with https://search.maven.org/
Further Reading and References
The following resources might be useful for more information about deployments:
Manage, Monitor and Learn Apache Kafka with Kpow by Factor House.
We know how easy Apache Kafka® can be with the right tools. We built Kpow to make the developer experience with Kafka simple and enjoyable, and to save businesses time and money while growing their Kafka expertise. A single Docker container or JAR file that installs in minutes, Kpow's unique Kafka UI gives you instant visibility of your clusters and immediate access to your data.
Kpow is compatible with Apache Kafka+1.0, Red Hat AMQ Streams, Amazon MSK, Instaclustr, Aiven, Vectorized, Azure Event Hubs, Confluent Platform, and Confluent Cloud.
Start with a free 30-day trial and solve your Kafka issues within minutes.
Join the Factor Community
We’re building more than products, we’re building a community. Whether you're getting started or pushing the limits of what's possible with Kafka and Flink, we invite you to connect, share, and learn with others.