Overview
Kpow is the all-in-one engineering toolkit for Apache Kafka, Redpanda, and compatible streaming platforms. It provides engineers with a unified interface to monitor, manage, and explore their streaming resources.
Kpow is fully compatible with Oracle Cloud Infrastructure (OCI) Streaming with Apache Kafka (Oracle’s dedicated managed service) out of the box. Because Kpow uses standard Kafka protocols, it integrates seamlessly with your OCI cluster without requiring proprietary plugins, sidecars, or complex custom configurations.
OCI provides two Kafka-compatible services. This guide focuses on the dedicated OCI Streaming with Apache Kafka service which supports the full Kafka API, though the configuration remains similar for the serverless OCI Streaming offering as well. Check this page for more details.
About Factor House
Factor House is a leader in real-time data tooling, empowering engineers with innovative solutions for Apache Kafka® and Apache Flink®.
Our flagship product, Kpow for Apache Kafka, is the market-leading enterprise solution for Kafka management and monitoring.
Start your free 30-day trial or explore our live multi-cluster demo environment to see Kpow in action.
Prerequisites
To connect Kpow to OCI, you must have the following resources provisioned:
- A running OCI Kafka cluster: A dedicated “OCI Streaming with Apache Kafka” instance.
- Network reachability: Ensure your Security Lists or Network Security Groups allow inbound traffic on port 9092 (or 9093) from the host running Kpow.
- Connection Details: Your Bootstrap Server address. Note that while this guide uses SASL/SCRAM, Mutual TLS (mTLS) is also supported.
- Authentication: The username and password defined in your OCI Vault Secret for SASL/SCRAM authentication.
- A Kpow Enterprise License: Get a free 30-day trial.
Quick Start
The fastest way to connect Kpow to OCI is using our standard Enterprise Docker image.
Run the following command in your terminal, replacing the placeholder values with your specific OCI connection details:
docker run -p 3000:3000 \
  --env BOOTSTRAP="[OCI_BOOTSTRAP_ADDRESS]:9092" \
  --env SECURITY_PROTOCOL="SASL_SSL" \
  --env SASL_MECHANISM="SCRAM-SHA-512" \
  --env SASL_JAAS_CONFIG='org.apache.kafka.common.security.scram.ScramLoginModule required username="[VAULT_USERNAME]" password="[VAULT_PASSWORD]";' \
  --env LICENSE_ID="<LICENSE_ID>" \
  --env LICENSE_CODE="<LICENSE_CODE>" \
  --env LICENSEE="<LICENSEE>" \
  --env LICENSE_EXPIRY="<LICENSE_EXPIRY>" \
  --env LICENSE_SIGNATURE="<LICENSE_SIGNATURE>" \
  factorhouse/kpow:latest
Notes
- License details: The license details can be obtained from your signup email or via the Factor House license portal.
- Authorization configuration: For brevity, Kpow authorization configuration has been omitted. See Simple Access Control to enable necessary user actions.
Once the container starts, navigate to http://localhost:3000. You will see an overview of your OCI topics, brokers, and consumer groups.
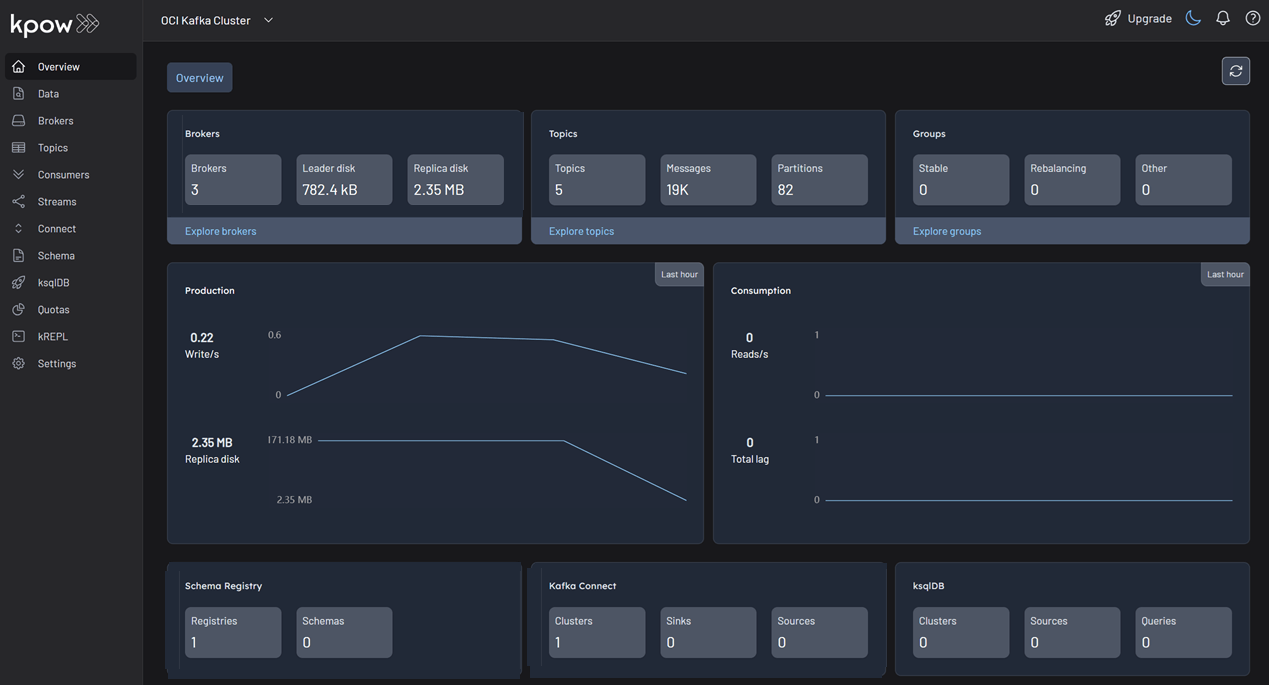
This screenshot displays a cluster with three Kafka brokers and one instance each of Kafka Connect and Schema Registry. Your specific view will vary depending on your environment configuration.
Configuration Details
OCI Dedicated Kafka uses SASL/SCRAM-SHA-512 for authentication, which is backed by the OCI Vault service. The credentials used in the SASL_JAAS_CONFIG are the keys and values you defined inside your OCI Vault Secret JSON. These are distinct from your Oracle Cloud console login or IAM credentials.
Kpow also supports OCI clusters configured with mTLS. For a comprehensive list of configuration options, including mTLS setup and advanced security configurations, refer to our Kpow OCI Provider Documentation.
Ecosystem Integration
Since OCI does not provide managed Kafka Connect or Schema Registry services, you may be running self-hosted instances on OCI Compute or OKE. You can integrate these into Kpow by adding the following environment variables:
- Kafka Connect:
--env CONNECT_REST_URL="http://connect-host:8083" - Schema Registry:
--env SCHEMA_REGISTRY_URL="http://schema-registry-host:8081"
Once configured, Kpow provides full visibility into your connectors and schemas alongside your OCI brokers. For further details, refer to the documentation for Kafka Connect and Schema Registry configuration.
Production Deployment
When you are ready to move from a local Docker test to a production deployment, we recommend the following paths:
Kubernetes
Kpow runs seamlessly on OKE (Oracle Kubernetes Engine). We recommend following our official Helm Installation Guide for deployment.
VM / Bare Metal
For running on OCI Compute instances, you can also use the Kpow JAR artifact.
Conclusion
Kpow provides a single pane of glass for your OCI Streaming with Apache Kafka infrastructure, making it easy to monitor and manage your data streams in real-time.
Explore these features in your own environment with a free 30-day trial of Kpow.
If you need assistance with your OCI integration, reach out to our engineering support team at [email protected].